Wordwall: Create better lessons quicker
| Site: | Vitajte v prostredí e-learningu na Filozofickej fakulte PU |
| Course: | ELT: DASS Online Digital Tools |
| Book: | Wordwall: Create better lessons quicker |
| Printed by: | Hosťovský používateľ |
| Date: | Tuesday, 21 July 2026, 12:49 PM |
1. About the Wordwall
Wordwall is the platform which allows teachers to create interactive games and printed materials for their students. Teachers simply enter the content they want, choose the template and Wordwall automate the rest. The most important is - it is easy to use! You don't have to be skilled in IT to create as much activities as you want.
Click Features to see basics of Wordwall and frequently asked questions
OR
watch the video of Wordwall, which shows briefly, what is Wordwall about and what can you find there:
2. Benefits
In this chapter you can find BENEFITS of Wordwall platform, which are for us very important and show you the reliability of this programme.
a.) Accessibility:
There are many templates, which are useable in many ways by teaching. Moreover, students don't have to sign up in this platform, they just follow the link you send them or scan the QR code to access task. Furthermore, activities can be placed on another website using a snippet of HTML code. It works in the same way as the video embed feature you find on YouTube, giving you a playable activity on your own site. You can also share it in google classroom.
b.) Easy to use:
c.) Advanced options:

There are many themes like sort of 'wallpaper' you can use to interest the students more. Each theme changes the look and feel with different graphics, fonts, and sounds. If you make a mistake by doing an activity and you realize that after finishing it, you can just click 'Edit content' underneath the activity and correct it. There are also many further options to set a timer, change the gameplay and change the font. You can change the layout for each play too.
d.) Outcomes:
 This platform enable you to see the results of your students. It is good, when you send it to them as a homework and you don't have to correct their assignment. However, it can be used also during the lesson, when they do independent activity. You can see statistically, average score, top score, the fastest student. Moreover, you see correct and incorrect results by question and score disctribution between students. Then you can compare the students and see each results and results by question. The advantage of it, that you know, which aera is big trouble for them. On the other side it shows you, which area they know well.
e.) Interactives and printables:
Wordwall can be used to create both interactive and printable activities. Most of templates are available in both an interactive and a printable version. Interactives are played on any web-enabled device, like a computer, tablet, phone or interactive whiteboard. They can be played individually by students, or be teacher-led with students taking turns at the front of the class. Printables can printed out directly or downloaded as a PDF file. They can be used as a companion to the interactive or as stand-alone activities.
f.) Sharing:
 Any activity you create can be made public. This allows you to share its activity page link via email, on social media or via other means. It also allows other teachers to find the activity in Community search results, play it, and build upon it by clicking on 'Edit content'. If you prefer you can keep activities private, which means only you can access it.
3. Drawbacks
In this chapter you can find DRAWBACKS of Wordwall platform. You should go through them to be aware of disadvantages for using smoothly the Wordwall in ways it is only enable.

a.) Upgrade:
As we said in chapter 'Benefits' the Wordwall is free platform for first 5 activities. After that you have to pay for upgrade, but it is not so expensive. There are two plans to pay for:
=>Standard plan:
This includes:
- Creating unlimited activities
- Printables
- 18 standard templates
=> Pro plan:
This includes
- Creating unlimited activities
- Printables
- 18 standard templates
- 15 pro templates
b.) Switching templates are not so easy:
 We say, that there are many templates you can use for creating activity. And if you have activity and template is not good enough, you can switch for another one. However, some templates are not compatible with another. For example:
Some templates, like Anagram or Wordsearch, only work with plain text. If your material contains images, numbers, or special characters, we can't always convert them into those text-based templates.
Some templates require a minimum amount of content. For example, a Whack-a-mole requires at least 5 correct and 5 incorrect answers.
Some templates, like Random wheel, have a simple list of content, which can't be converted into more complex structures like questions and answers.
c.) Little options:
For some teachers available options are not enough. Maybe they want to underline some things in sentences or mark some words etc to highlight it for students. This is not available in options that Wordwall offer. d.) Question's time:
In case of results, there is no information about amount of time students needs by doing certain question. It would be good for teacher to see this, when students do homework and when teacher wants to give a test to student, teacher knows the amount of time, students need for taking the test.
e.) Not all are printable:
In case of activities, some templates are not printable, so it might by a problem, when teacher doesn't want to use digital divice and prin it for students as a test etc.f.) Private the activity:
 The option of privating the activity is good, until you are the teacher, who needs it. When you make your activity private, it is good for keeping the rights on it. However, it is of no use for other teachers that might like it.
4. How to use Wordwall
In this chapter you will find information, how to use Wordwall platform. There will be general information about using it, which may go for every template you choose. This chapter shows you step by step, from how to create your account to creating activity. It learns you how to use this platform in general.
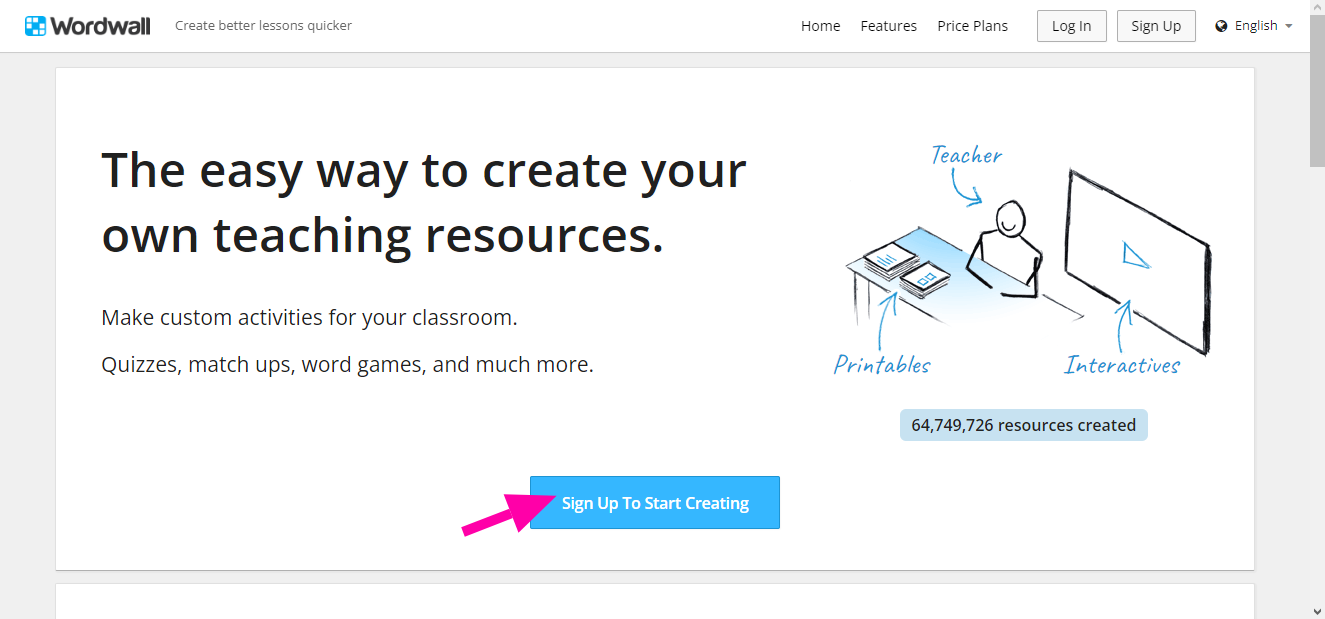
a.) Creating account:
Go to Wordwall and sign up here clicking on this button:
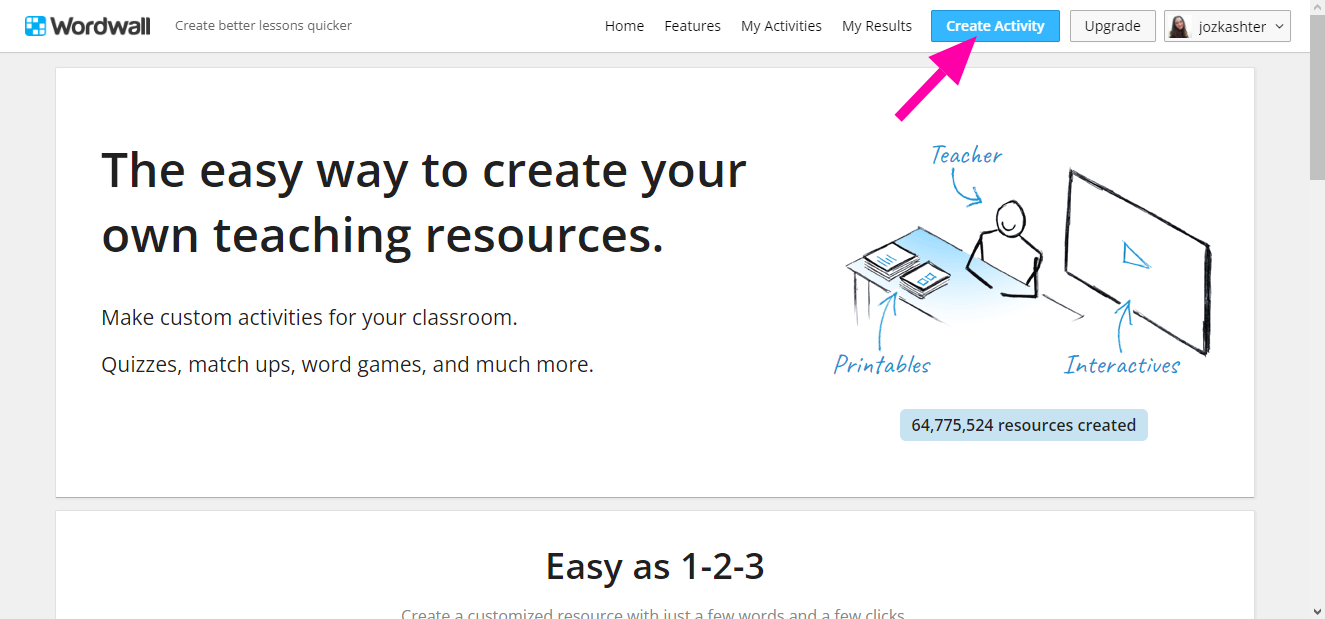
b.) Creating activity:
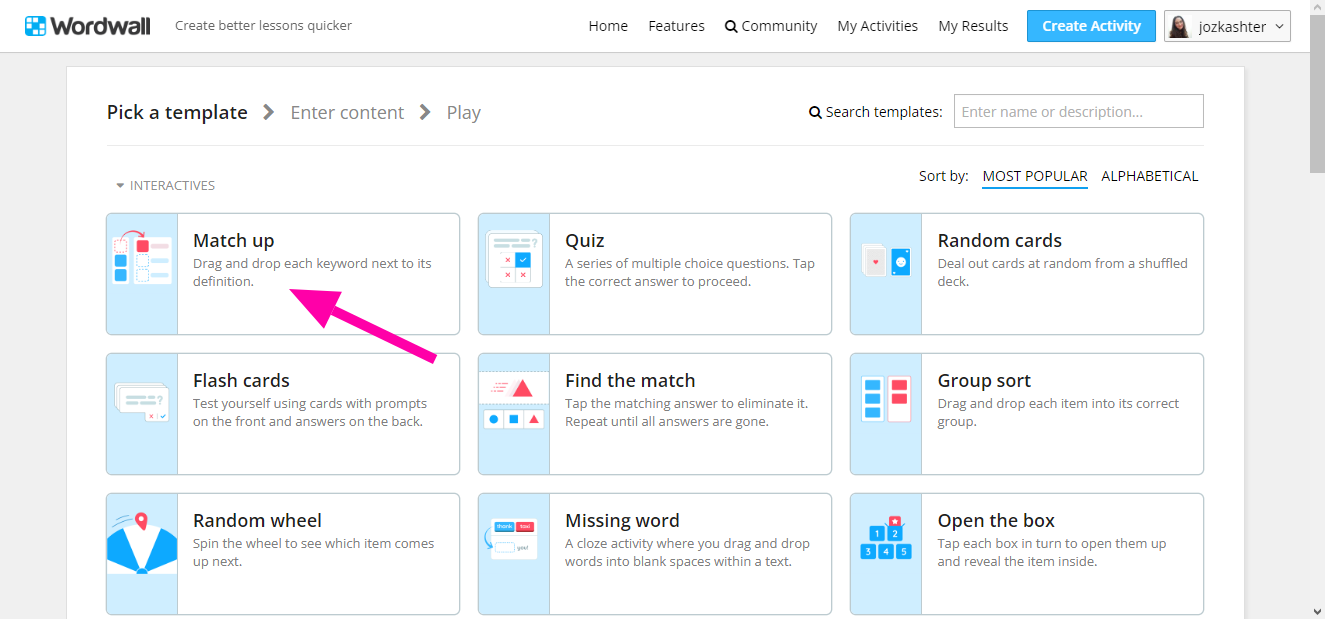
After you log in, click on 'Create Activity' button.
The platform will show you many templates, from which you can choose from. Doing each activity, will be explained in further chapters. There will be shown the general using of each activity. We pick first template, which is very easy to use and show you basic rules of using:
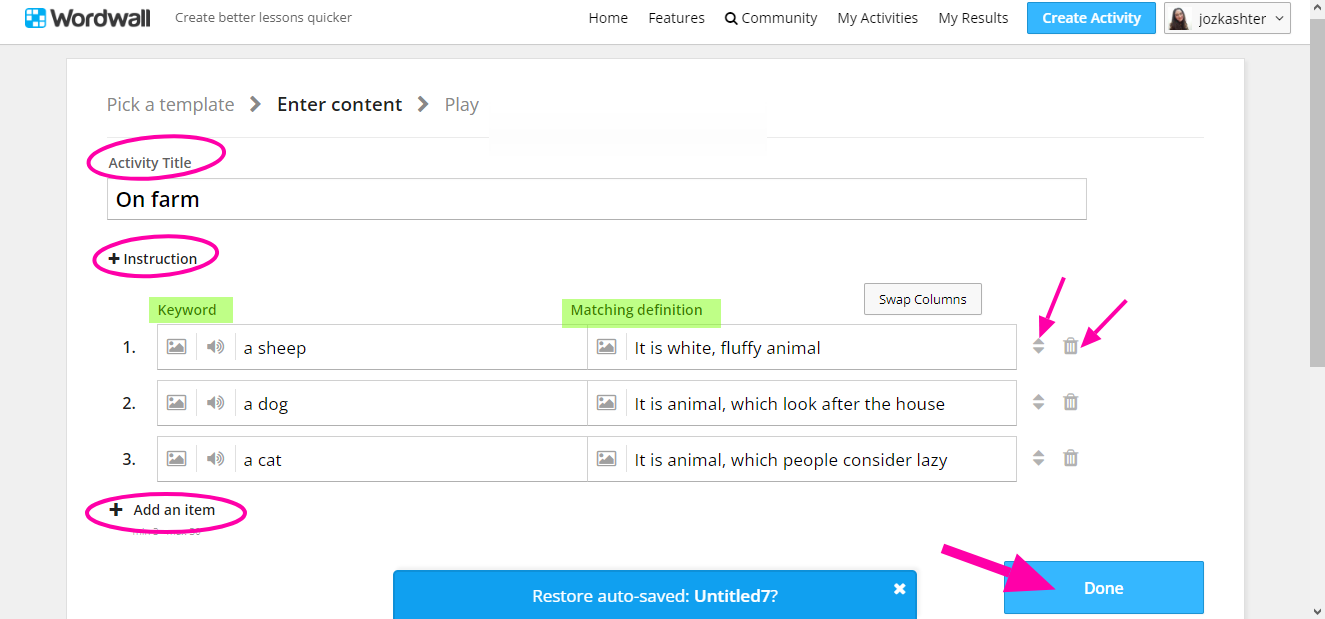
There will be always the window for writing the Title of your activity. Below it you can find the Instruction button with plus +. You can add it there, but its optional. Further, there will be windows, where you must write Key words, which students are supposed to learn or find and match with their meaning. For meaning there are opposite windows. There you must write the meaning of your Key words. You can add there also the pictures and sounds. However these details we will describe in further chapters. When you are finished with filling the key words and matching definitons, you can click on the button 'Done'.
If you want to add more key words, you can click on plus button +, which call 'Add an item'. It allows you to add as much key words as you need. Then you can also switch the order of particular key words and their matching. On right side of matching definition, there are arrows, which allows you to manipulate order, if you want so.
If you want to delete key word or item, you can click on icon Trash 🗑 and delete the item.
c.) Basic options for every activity:
There are many options for activities, which go for every activity. On printscreen you can see, where you can find these buttons and below you can find the description to every button:
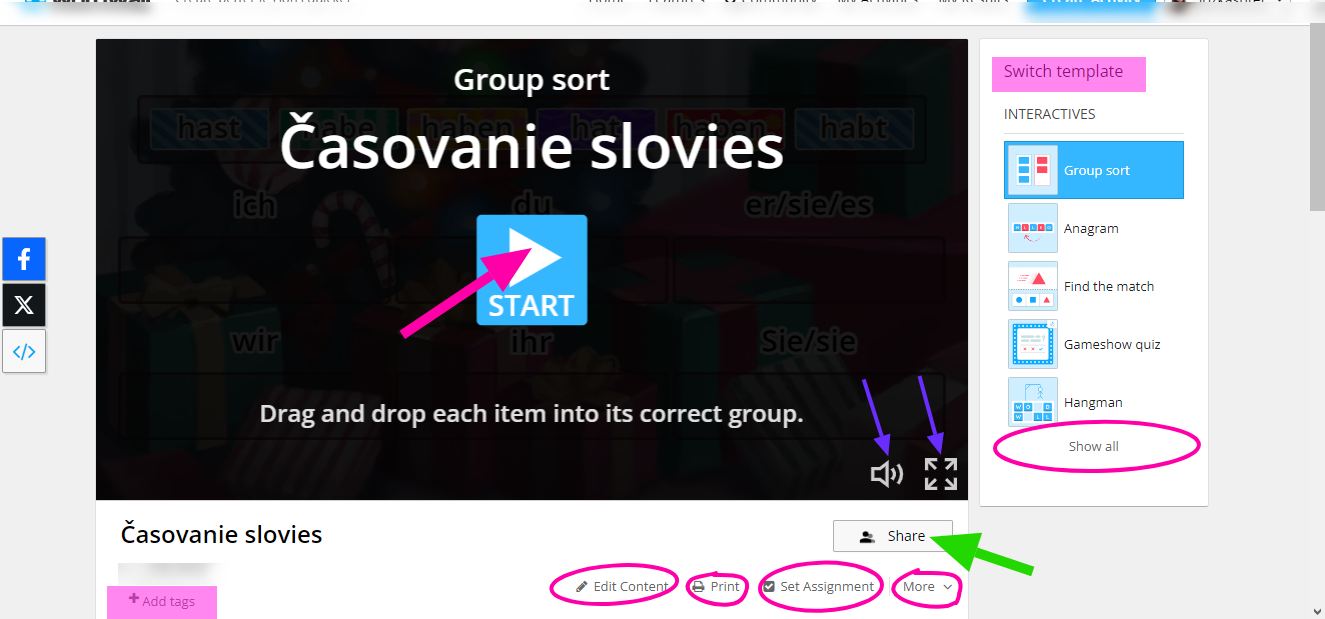
I. START:
The button 'Start' allows you to start your activity you created with your students.
II. ICON SPEAKER:
The icon 'Speaker' allows you to turn on or off the music and sound effects of your activity.
III. ARROWS in SQUARE:
The button next to speaker allows you to extend your activity to regime on whole screen.
IV. SWITCH TEMPLATE:
The button 'Switch template' allows you to switch template of your activity to another template. The platform automatically switch to another template and rearrange your key words and definition to fit the template correctly.
V. SHOW ALL:
The button 'Show all' show you every template you can use with your chosen template. As we said in chapter 'Drawbacks', not every template is compatible with other. So it depends on, which template you choose in the beginning of your creating.
VI. SHARE:
The button 'Share' allows you to share your activity with other teachers. You have there publish settings, where you can add tags to your activity like age, subject and topic. You can also change the title of your activity. If you want to, you can remain your activity private.
VII. ADD TAGS:
As we said above, you can manage your tags of your activity, such as age band, subject of your activity and topic.
VIII. EDIT CONTENT:
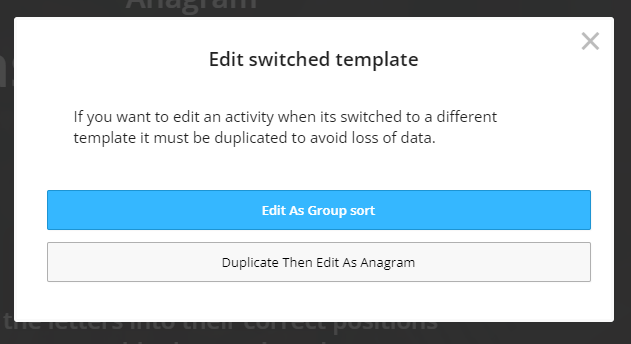
The button 'Edit content' allows you to edit the content of your activity again. You can delete or add items if you want. However, if you have switched to another template before clicking on this button, the platform shows you two other options:
=> to edit the template you have switched to (the button 'Duplicate Then Edit As'...)
=> or edit your original activity (button 'Edit As'...)
IX. PRINT:
The button 'Print' allows you to print your activity. You have there many other options such as how many activities you want per page, changing instructions, orientation and what you want to be shown on your page (Title, Name, Date,...). You can choose there from templates too. You can also print it immediately or download the activity as pdf.
X. SET ASSIGNMENT:
The button 'Set assignment' allows you to set your assignment to your students. There are many difficult options, which we show below:
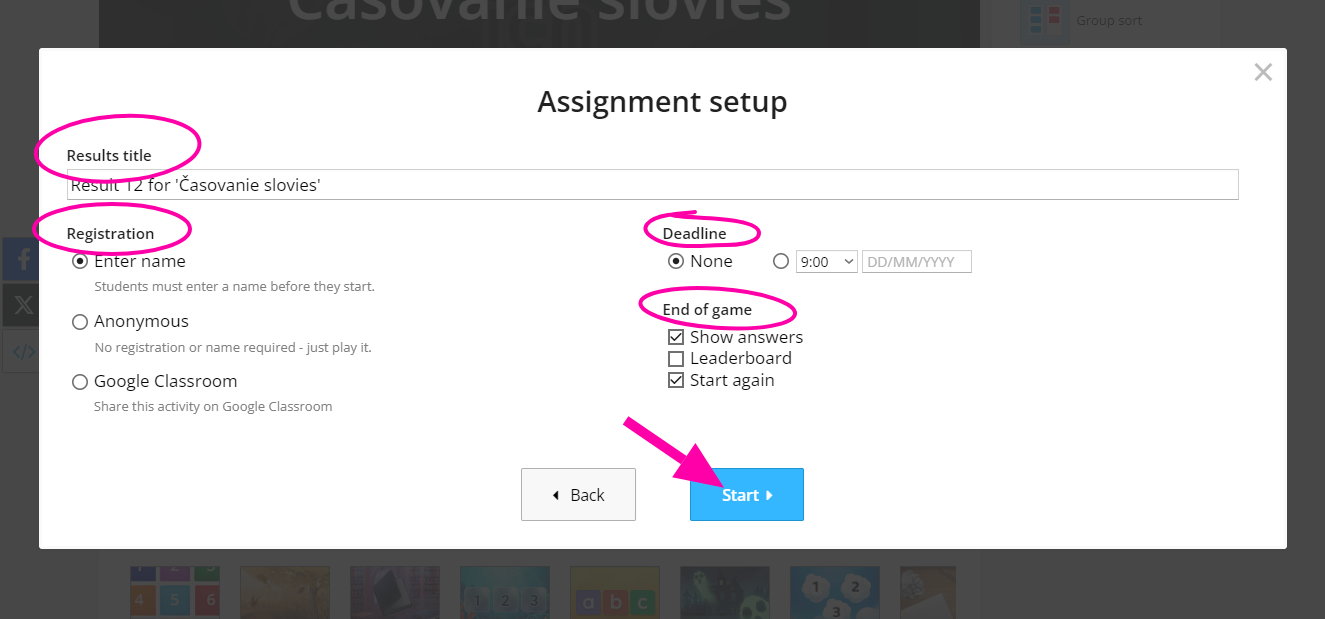
You can rename your title below 'Results title'. Then you can find there 'Registration'. There are three options to choose:
=> Enter Name: If you choose this one, the students are required to enter their name before starting the activity. It is good for collecting the results from your students.
=> Anonymous: Students are not required to set their names and can do activity anonymously. It is good, when you do not want to students to compare themselves with others, just to revise the lesson in the end and find out which area they struggle with.
=> Google classroom: You can put your link for activity to your google classroom. It is good, when you want to set the homework for your students.
You have there 'Deadline'. There you can set the deadline for doing activity. And last one is 'End of game', which are the options, how the game ends. What buttons do you want to be shown after the game: Show answers, Leaderboard and Start again.
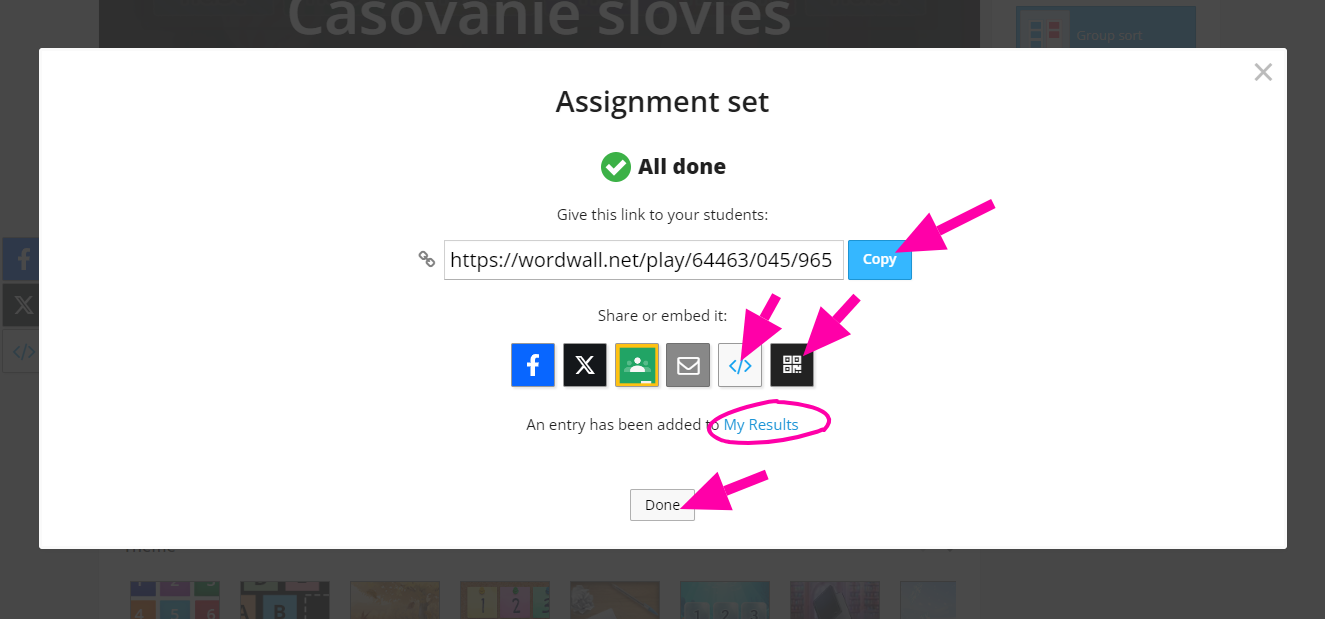
When you are finished, you can click the button 'Done'. There you can find the link for your students, which you can copy easily by clicking on the button 'Copy' or you can share with them QR code, which is also there or you can 'Embed' it on your own website, which allows you the icon next to QR code. You can easily follow the results of your students by clicking on button 'My results'. Below you can find the printscreen of these buttons. When you are finished, you can clink another button 'Done'.
XI. MORE:
The button 'More' allows you to 'Embed' your activity on your website (but without collecting the results) or share the 'QR code' immediately. Thre is one option to 'Rename title' of your activity.
4.1 Extended Options
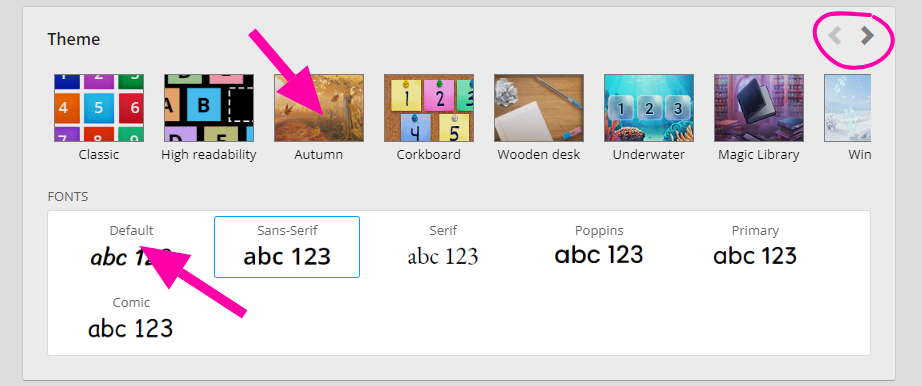
e.) Options Theme and Fond:
In this subchapter you can find more options for your activities. There are options as 'Themes' and 'Fonts', which allows you to change the Theme and Fond of your activity. By clicking on button 'abc 123', the fonds unpack for you and you can choose from them and click on some you want. By clicking on arrows on the right corner you can see other themes and choose from them to by clicking on one of them. The platform automates your choice and change the activity.
f.) Options for organizing the activity:
There are some more options for organizing your activity such as 'Time', 'Layout', 'Random' and 'End of game' option. We describe each of them below the printscreen:
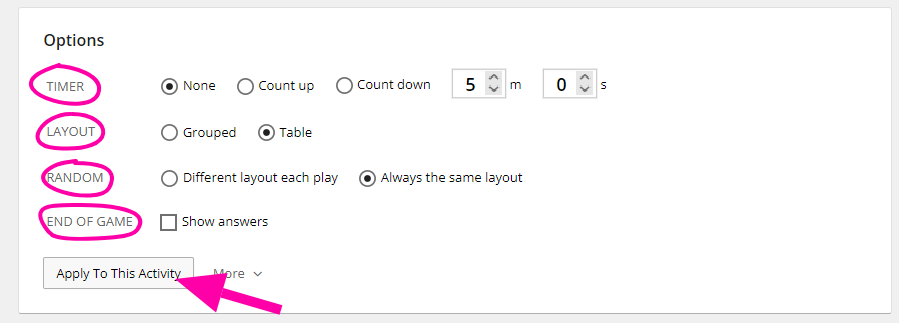
I. TIMER:
In this option you can set the time for your activity. You can choose, if you want time or not by clicking on button 'None'. And if you want you can choose, if the time will count up for you by clicking on 'Count up' button or count down. By button 'Count down' you have option to set time after which students are supposed to finish their assignment.
II. LAYOUT:
In this option you can rearrange your activity for 'Group' or 'Table'.
III. RANDOM:
This option allows you to choose, whether you can rearrange your items after the rounds (button 'Different layout each play') or not (button 'Always the same layout').
IV. END OF GAME:
There is the option by end of the game, if you want to show answers or not.
If you are done with your options, click the button 'Apply To This Activity'.
ATTENTION! For each activity, the option may defer, but when you understand what is activity about and how to create the activity, you will be able to use these options. They are similar to these above or very obvious one. So, read the next chapters carefully, and using of Wordwall will be piece of cake! 😄
5. How to create Activities
In further chapters we will describe each activity you can create in the Standard plan in Wordwall: what is the activity for and how to create it. You can easily follow the steps, which are shown in the next subchapter. You can also find the description for every activity separately, so you cannot get lost 😊
If you want to see the whole procces of making the activities and some more trick and tips, click on the youtube link below and watch it:
A. Match Up Activity
The Match Up is very easy to create activity. So first things first, you click on the bottom 'Create activity' and choose template 'Match Up'. Then you follow the steps:
1. You fill up the key words, your students have to match with their definitions.
2. You fill up the definition of each word.
3. In the activity, you will match the key word with their definitions.

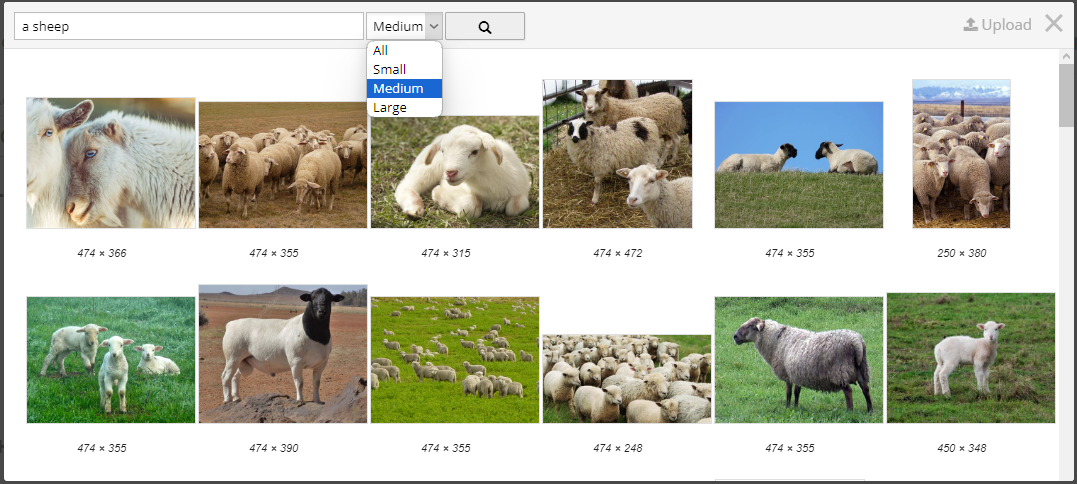
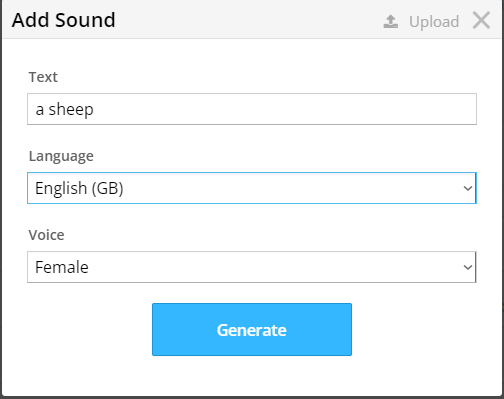
BONUS: You can add there photos or sounds of your key words or definitions.
Within photos, you can search for certain thing you want. You can also choose the size of your image and than choose whatever you want.
Within sounds you can choose the language of the word you want to be said. Then you can choose if the sound of the voice will be Female or Male. In the first column, you can write also what you want to be said. Or you can upload your own sound, too.
Your activity will look like this:
The task is to match the key words with their definitions. You just grab the key word and place it into the right column. You can do it with whole class on the Interactive Dashboard, or you can match the words, which the student agree on.
B. Quiz Activity:
In the activity Quiz, you can play the Quiz with your students. You can seperate them in the teams, or let them play it individually. You can score them for each correct answer. We will show the Quiz with the same key words and definitions as with Match up activity:
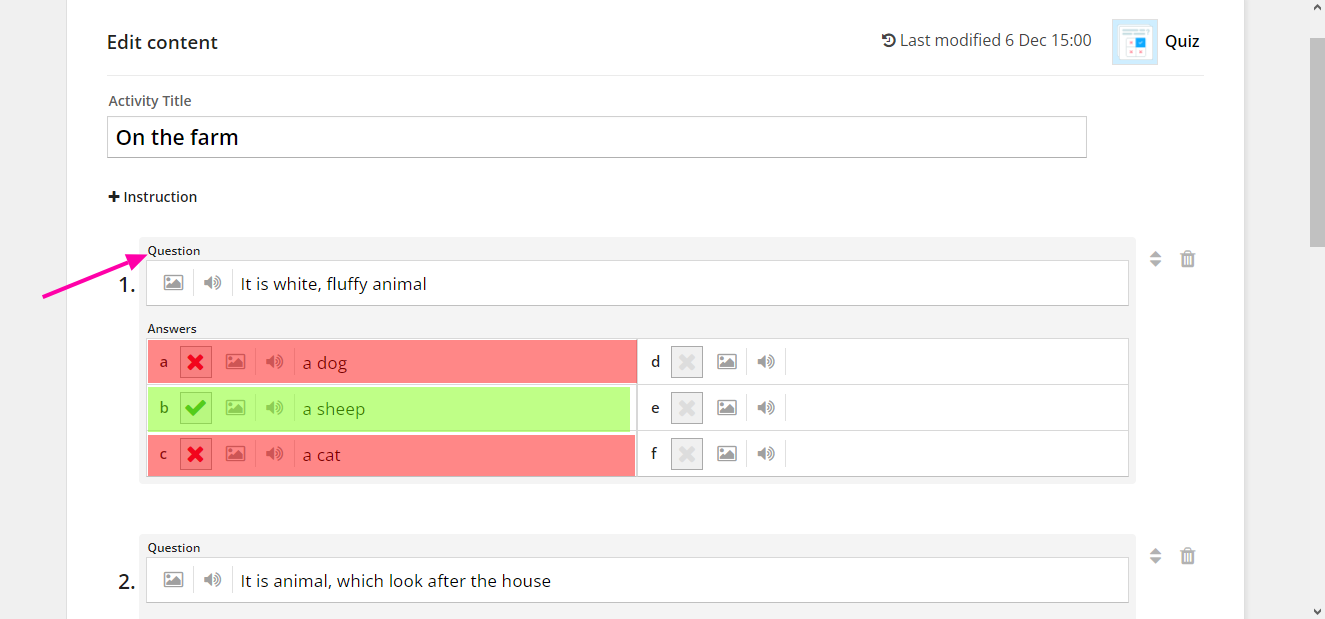
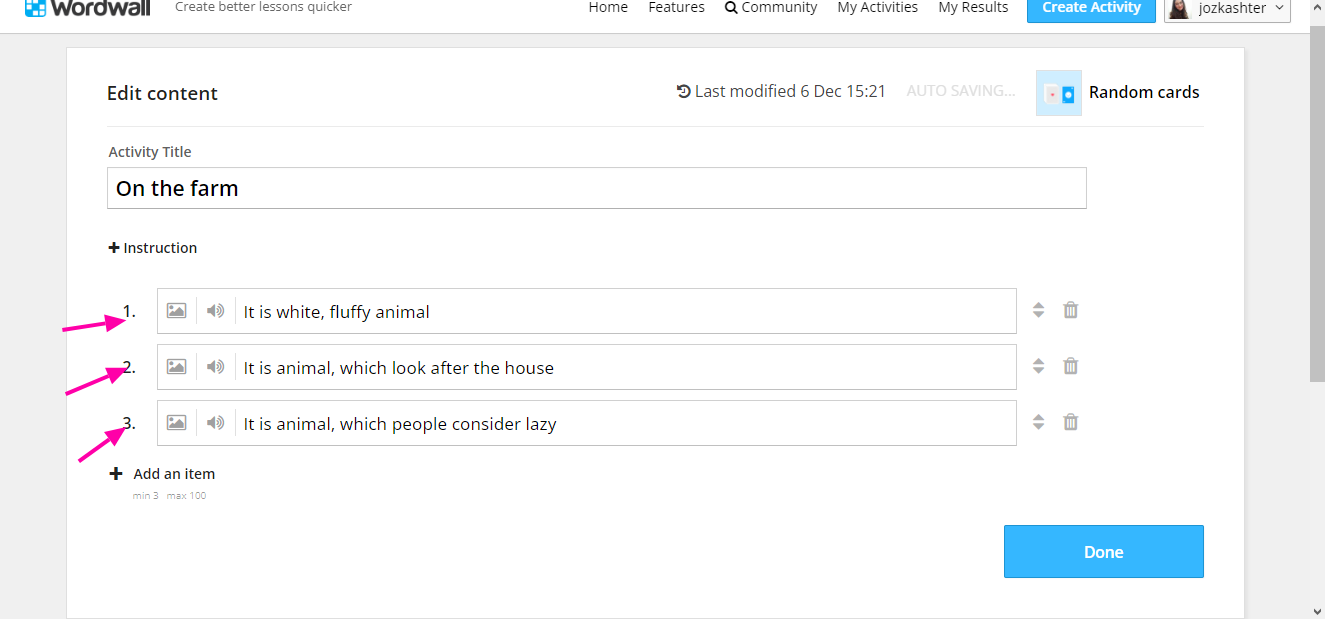
1. First step is to fill in the Question, so the definition for your key word.
2. You have to choose 2 or more other key words, students have to find, if you want to do the Quiz.
3. You fill in in the answers a,b,c all your key words.
4. You have to sign, which of your key words, from the answers a-b is correct (the check ✔ symbol) and waht is wrong (the X symbol).
5. Continue these steps with all your key words and definition, BUT be aware, which you sign as correct and incorrect!
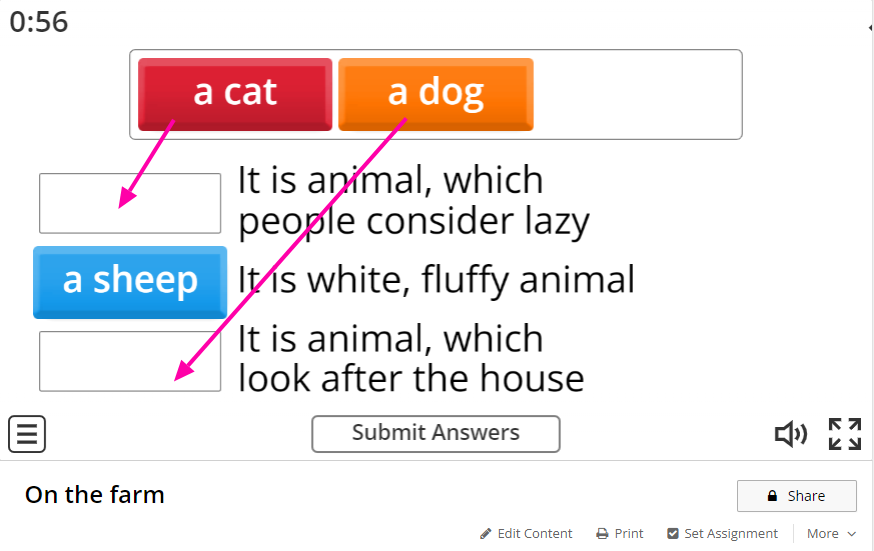
Your acitvity will look like this:
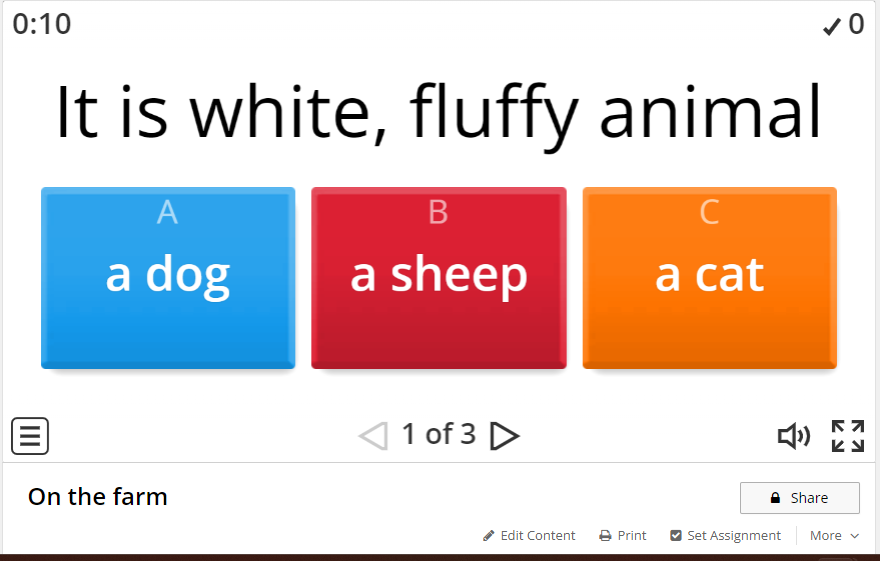
You have to choose from the 3 possible answers. Then you click the arrow in the bottom for the next questions.
In the right corner of your activity, you have points.
In the left corner you have timer.
C. Random Cards:
In the activity Random Cards, you have there deck of playing cards, which randomize you your key words or definitions (you have to choose what you want - the definitions or key words):
1. You just fill in the definitions or key words you want to randomize for your students. BUT you have to know the right answers, because they will not show in this activity.
This activity is good for randomize definitions or words, or names of your students, which you want to call.
Your activity will look like this:
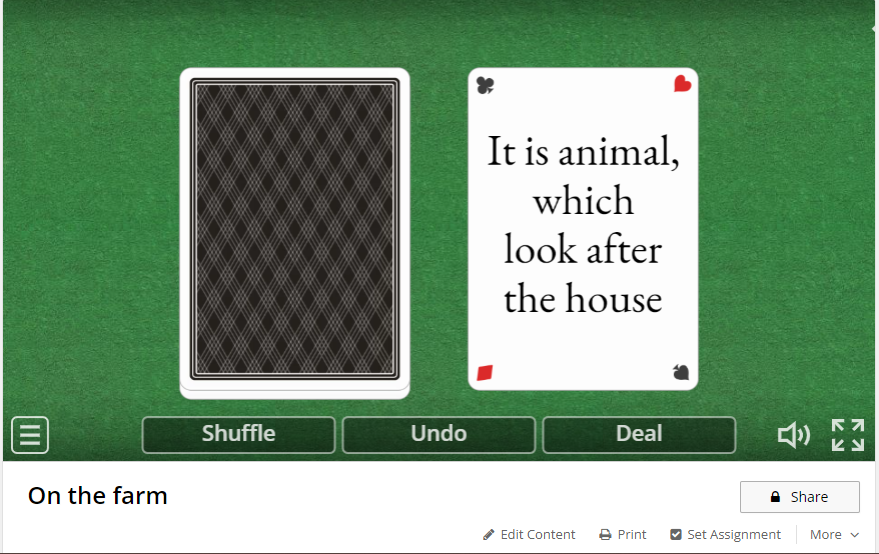
You have there some options:
a.) Shuffle = for shuffling the cards
b.) Undo = to put the card back
c.) Deal = to put the card on the table
D. Flash Cards Activity:
In the activity Flash Cards, you can make the cards, which have from one side the key word and on the other side the definition of the key word, or the translation. It is good for the language teaching, or for teaching definitions, if your students have problem with it. You can fill in the cards the definitions and then on the other side some example for better understanding of the grammar:
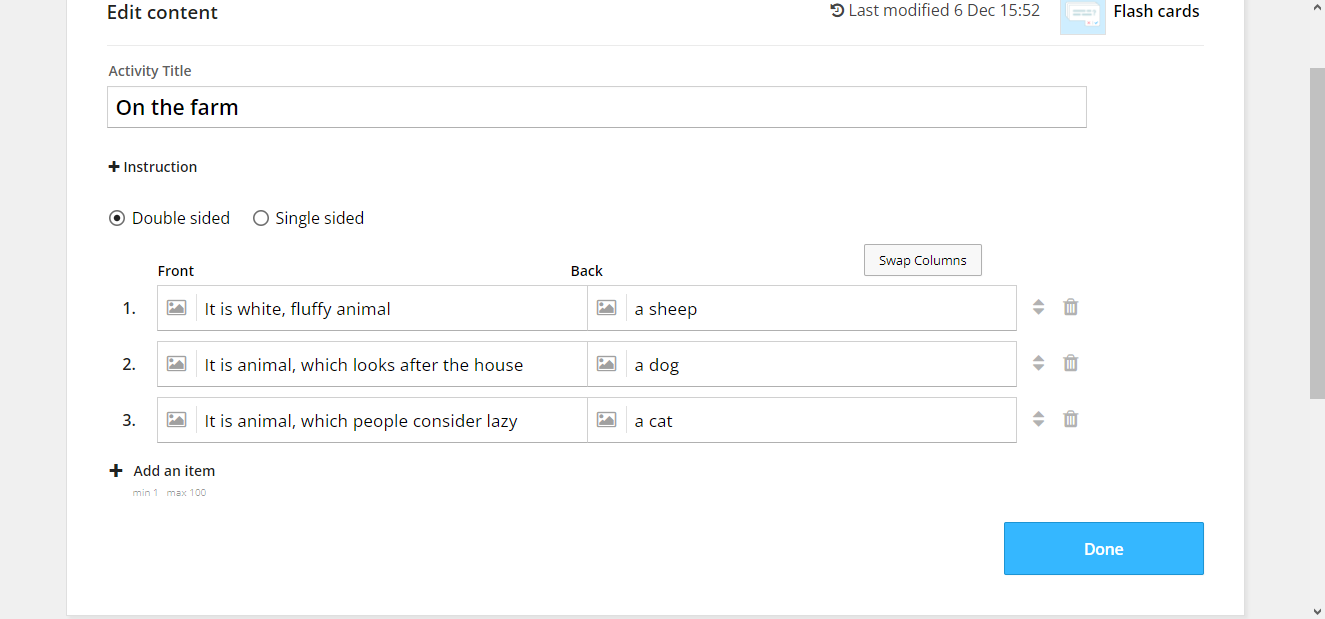
1. You have to fill in the definitions and the key words oposite to them
2. You can choose there, if you want single-sided cards, or double-sided.
Your activity will look like this:
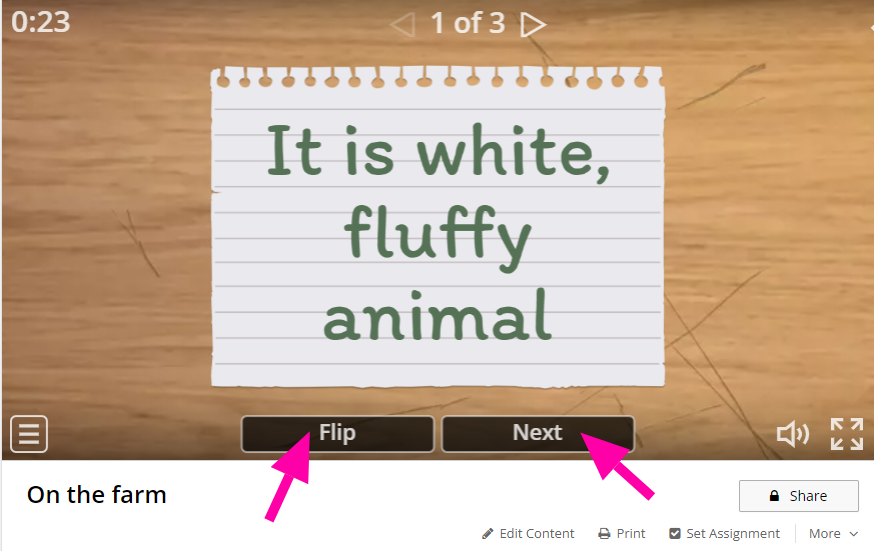
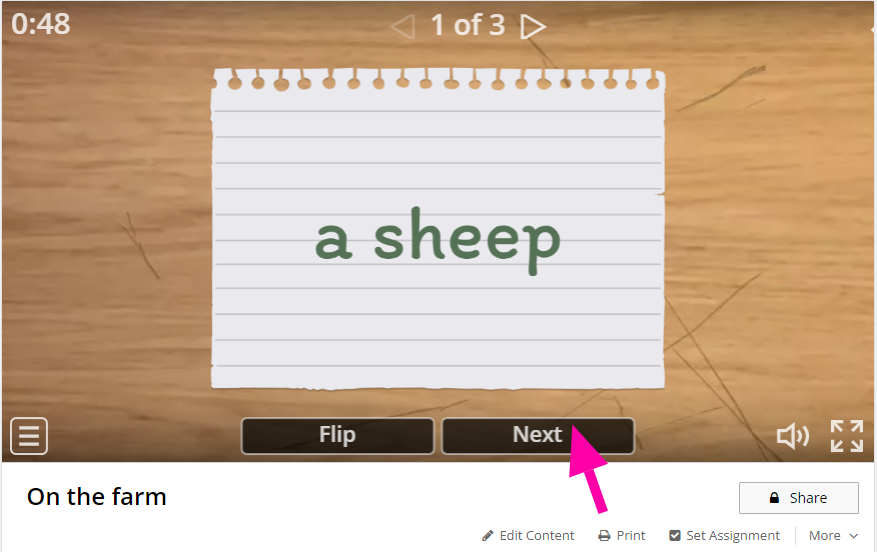
You have on the one side the definition and on the other side the key word. With the button 'Flip' you can turn around the card and show the key word. With the button 'Next', the activity will show next definition.
There are some extended options below the activity, so you shoul check and try them too.
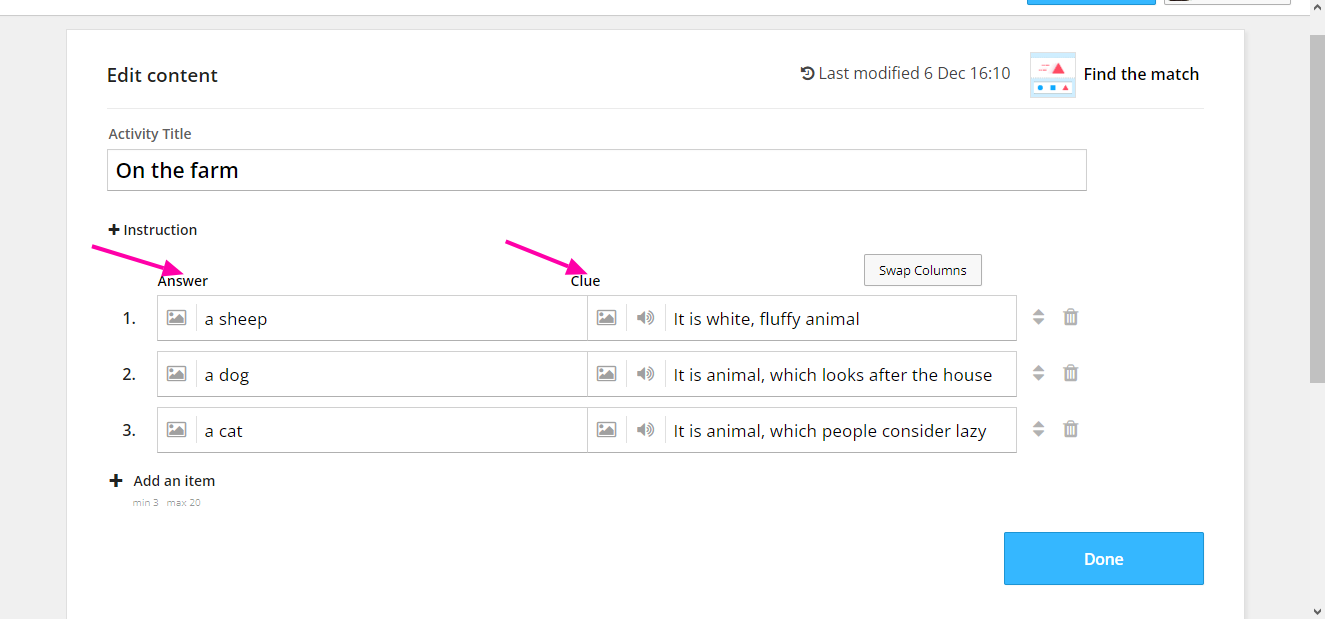
E. Find the Match:
The activity Find the Match is something similar as Quiz activity. However, in this activity, if you answer to the definition and click the right answer, in the next round your previous answer dissappear. So you have less options to choose from, which is easier. It is like the activity, where you have to use elimination method. The steps are similar, as in previous activites. Fill in the key words and definitions and you have you activity done. BUT there are answers and Clues, inspite of Key words and Definitions:
Your activity will look like this:
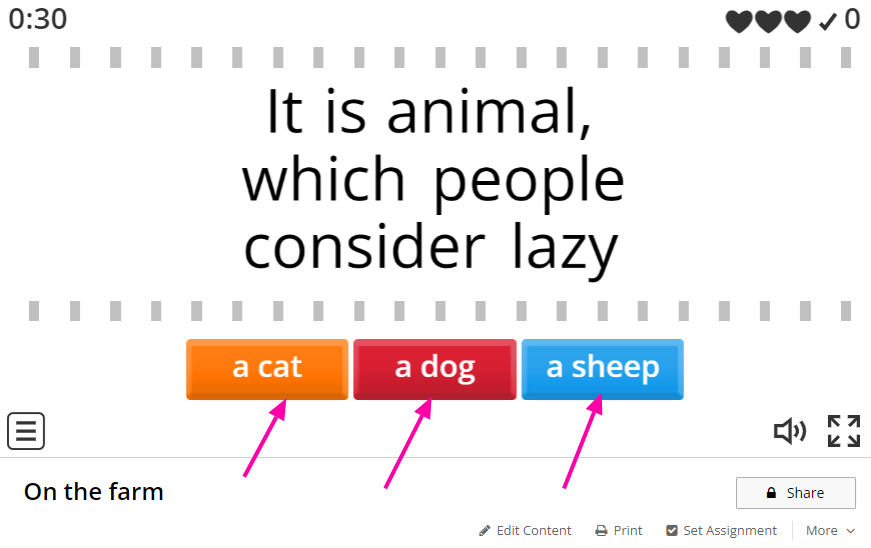
You have from three options there, you should choose from.
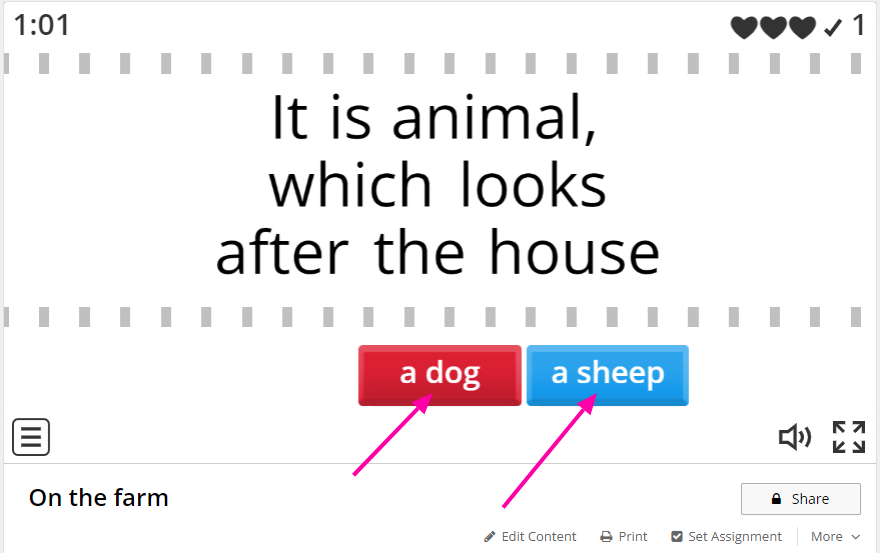
After picking the right answer you have only remain key wirds, you can choose from. However, you pick wrong answer, all your options remain.
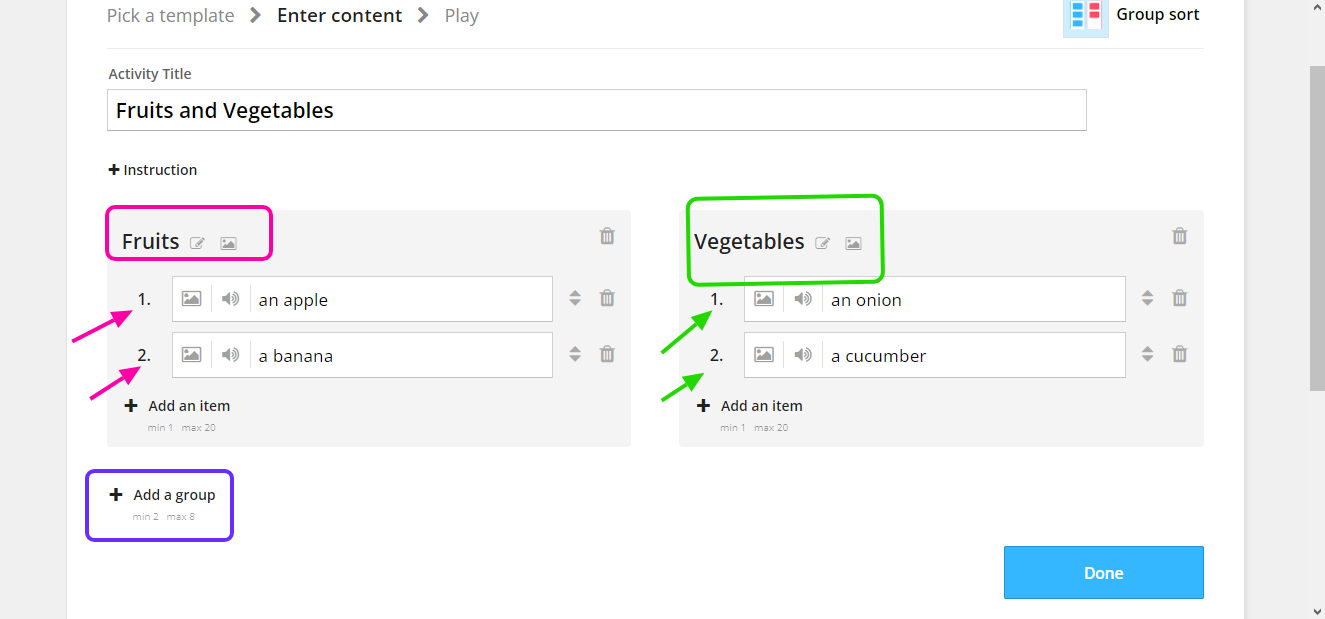
F. Group Sort
In the activity Group Sort, you can make two groups with the items that belong to them. The task of the students is to sort the items to these two or more gorups:
1. Make 2 or more groups and name them.
2. Fill in 2 or more items for each group (you can add there pictures, if you want+ it can be more interesting)
Your activity will look like this:
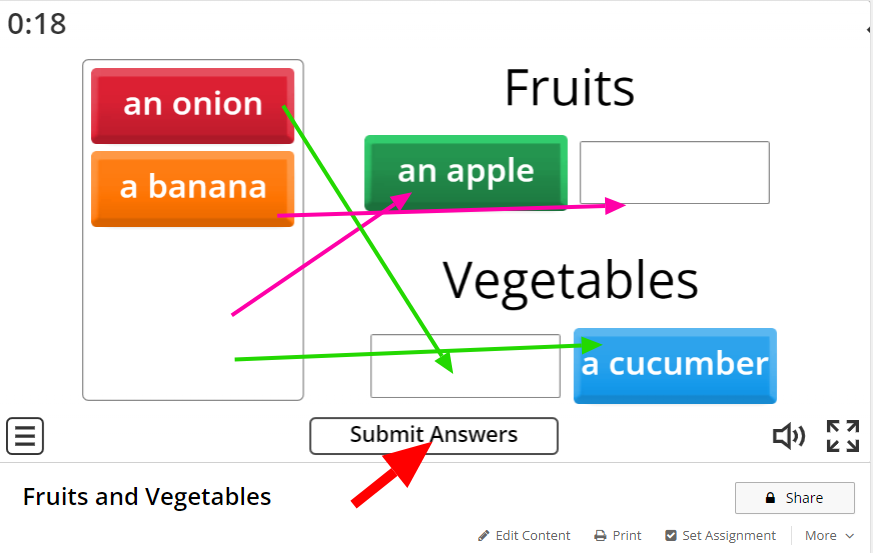
Your task is to sort the vegetables and fruits to its right colums (so below the name of the correct group). Then you can click the button 'Submit Answers' and check, if you're right.
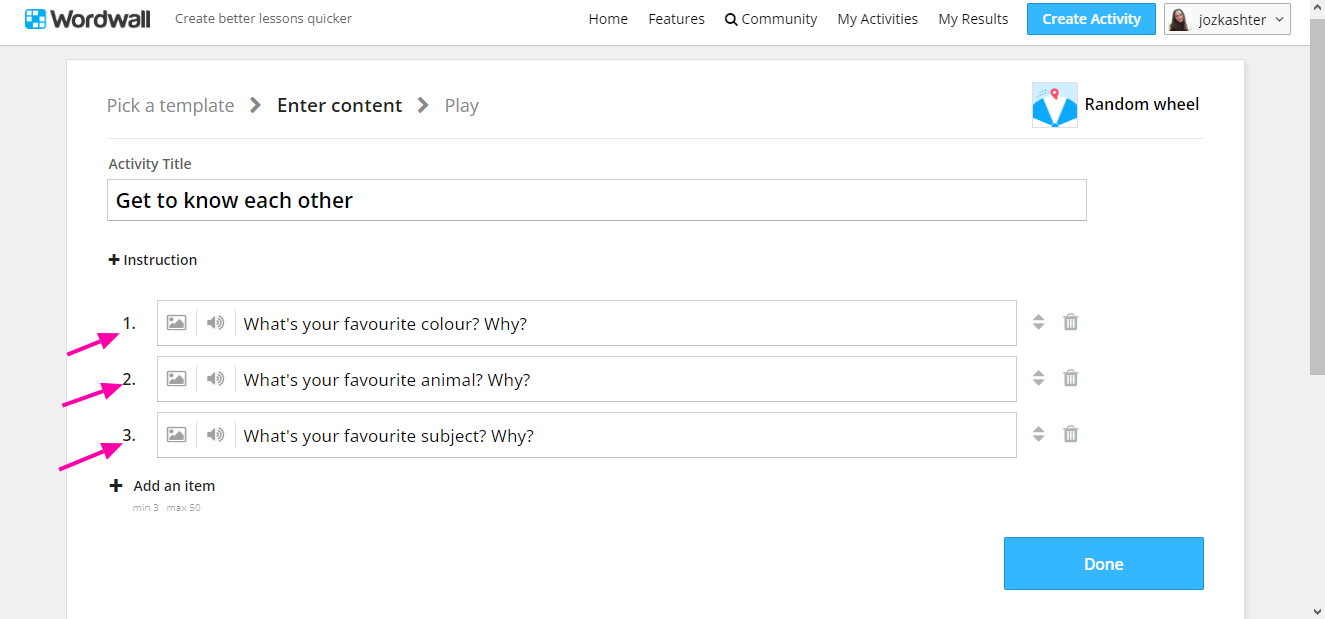
G. Random Wheel Activity
The activity Randon Wheel is similar to activity Random Cards. However, there is another display of the definitions, tasks, questions, key words or whatever you want to fill in. It is not in the cards, but on the Wheel:
1. Fill in whatever you want that your students have to do, or answer, or talk about.
Your activity will look like this:
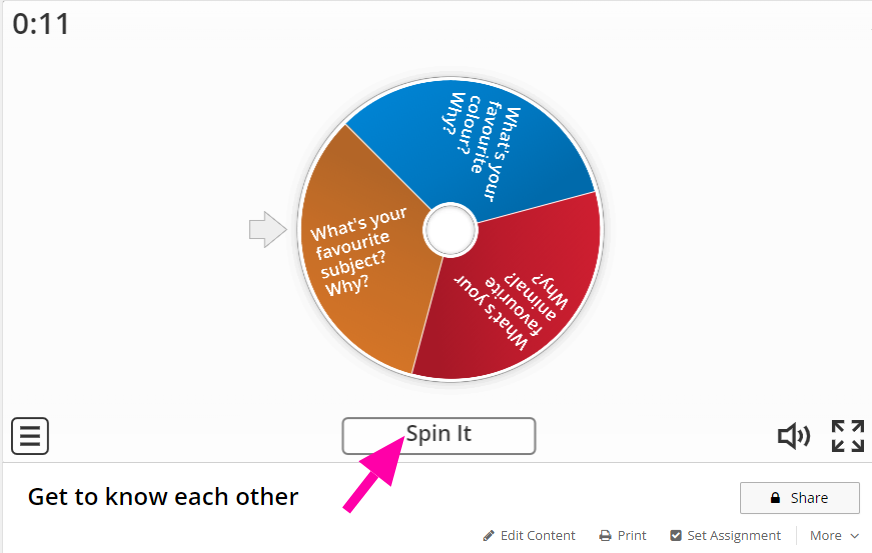
You click the button 'Spin it' and the Wheel starts spinning around and pick one of the questions for students:
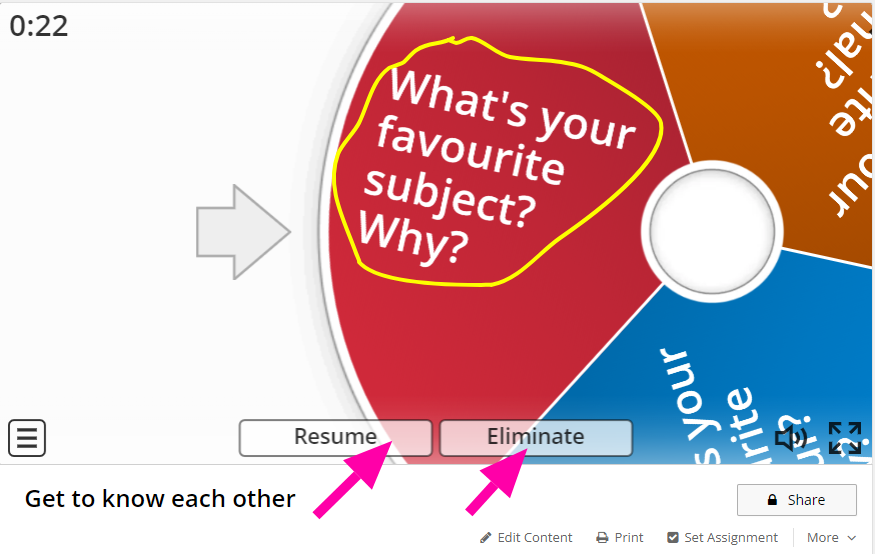
The question is set, so you give your students some time to talk in pairs about this topic. They have to ask this question their partner. After two minutes, you can eliminate the question by button 'Eliminate'. Then you can resume the game and spin again.
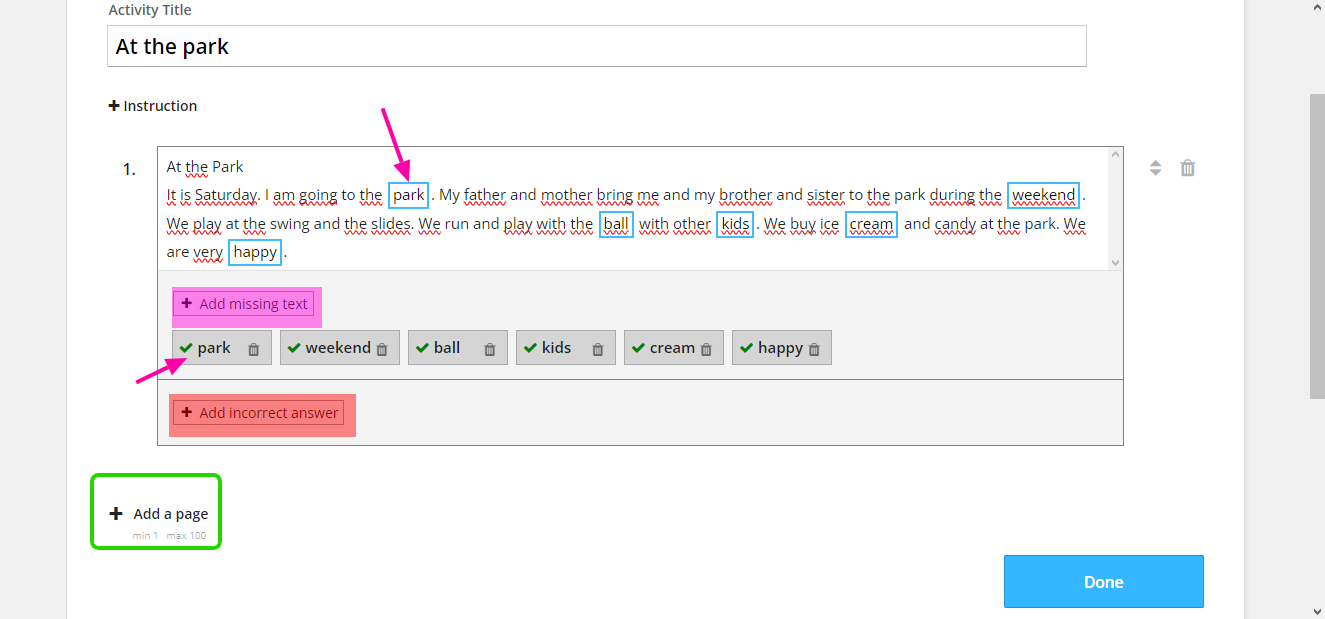
H. Missing Word Activity
In the activity Missing Word, you can put there a text for your students, where will be the missing wirds and words for filling the gaps. The task is to fill the gaps with the correct answer for options in the activity:
1. Put there the text you want to present the students.
2. Click on each word, you want to be 'missing word' and then click on the button 'Add missing word'.
3. You can add there the words, that will be incorrect. That serve as confusion for your kids. They have to think about the correct option and be very careful.
4. You can also make another page, where will be another text by clicking on the plus 'Add a page'.
Your activity will look like this:
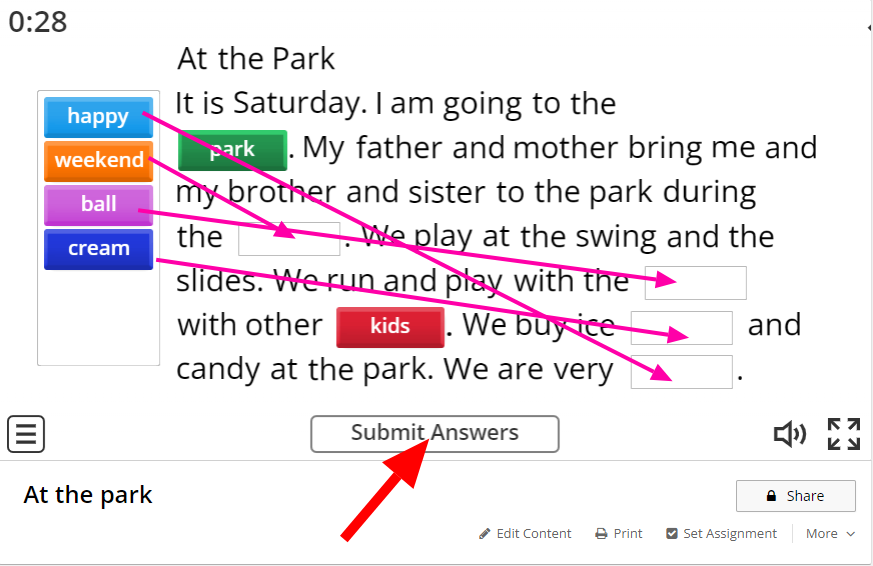
Your task is to grab the option and put it to the correct column. Then you click on the button 'Submit Answer' and the Wordwaal check your answers.
I. Open the Box Activity
The activity Open the Box is same as random Wheel and Random Cards. However in this case, you open the windows/boxes, in which you find your question, definition, key word or whatever you want. We use the pre-prepared activity from Random Wheel:
1. Fill in the column with your own items.
BONUS: You can choose from two options: Simple boxes OR Boxes with questions. We will show the Simple boxes option. In case of the second option, the activity will look like the Qui activity.
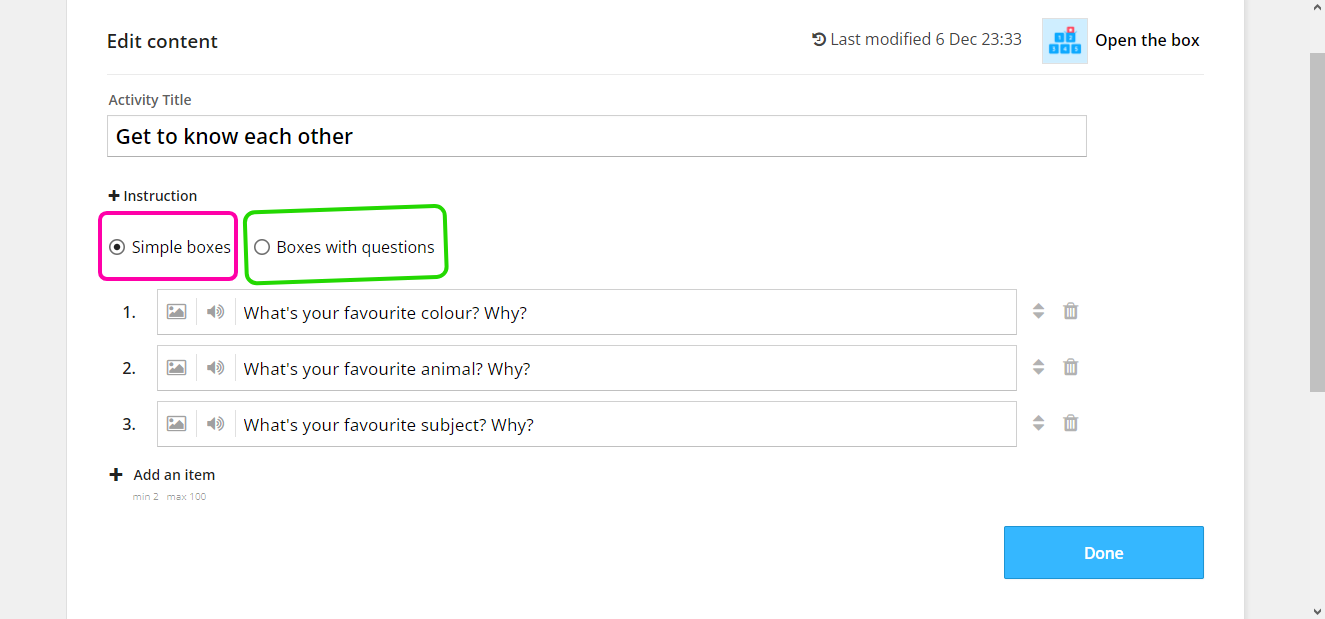
Your activity will look like this:

You can easily choose the option and click on the one box. Then the box show you the uestion etc.
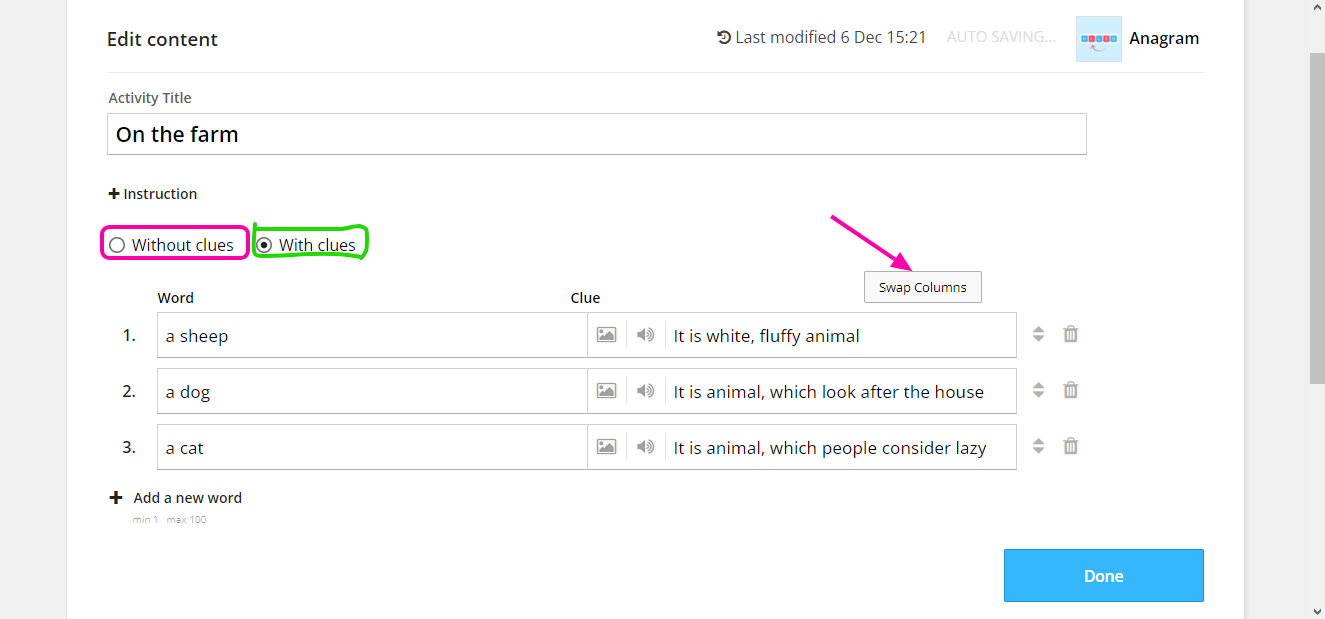
J. Anagram Activity
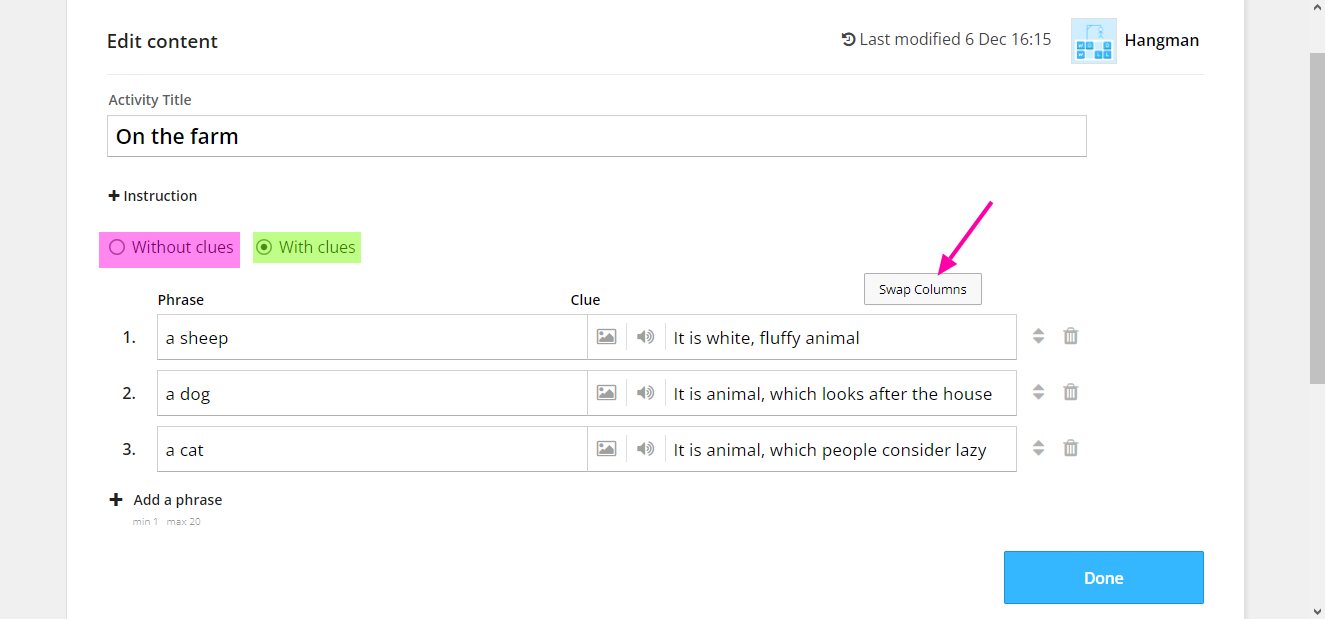
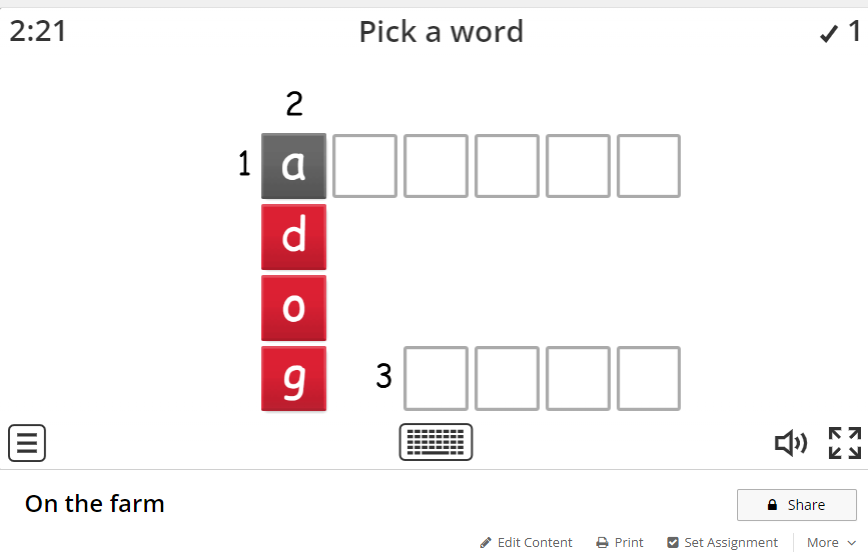
In the activity Anagram, your task is to put letter in order.:
1. Fill in the key words that students have to arrange.
2. Give students clues to know the word they should put in the right order.
You can also have the option Without the clues, if you want.
Furthermore, there is the button 'Swap columns', which make you able to swap the words and clues. So you do not have to rewrite your words and clues again, but the template automate it for you.
Your activity will look like this:
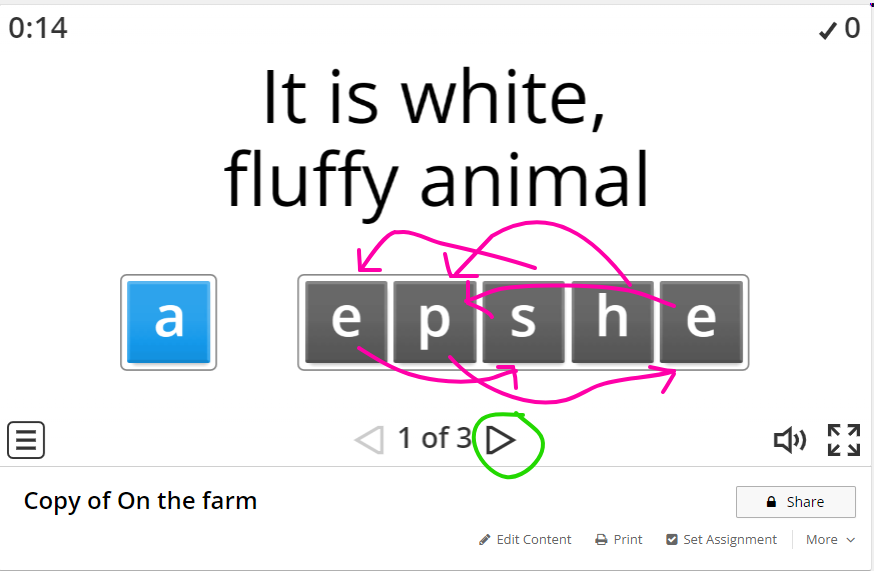
Your task is to grab the letter and put it in the correct place. If it is in the right place, it colours. With the arrows you can move to another word. If you do not have the clues, your students have to guess the word by themselves.
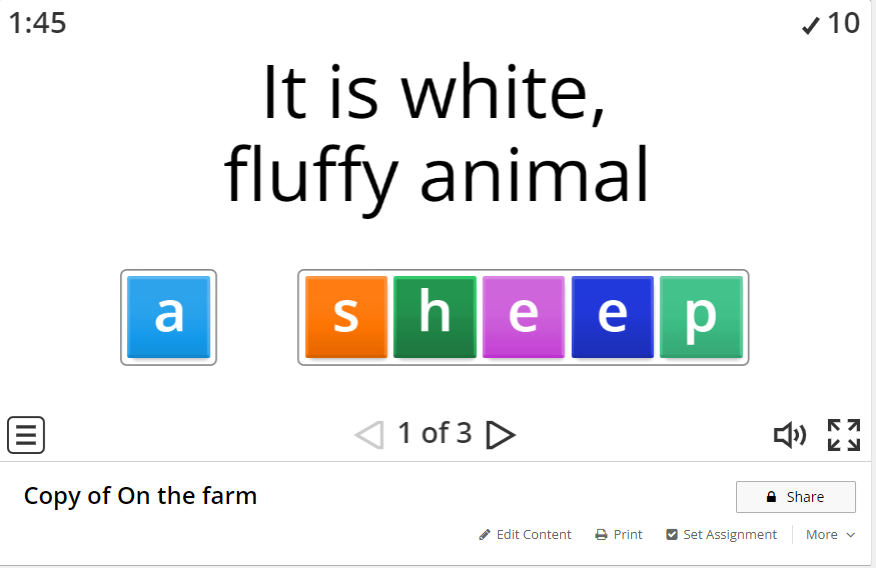
Your right answer will look like this.
...
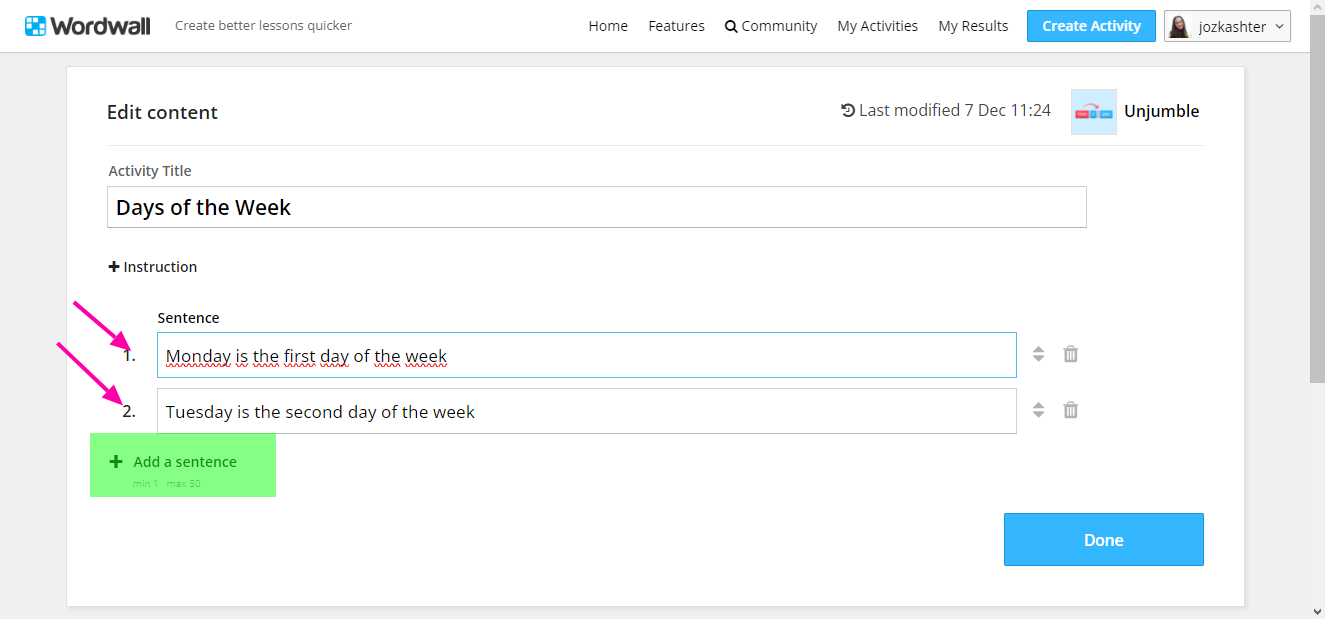
K. Unjumble:
The activity Unjumble is similar to Anagram. However, instead of letters that you have to put in the right order, there are words that you have to arrange:
1. Fill in the sentence, BUT without the dot (the platform will understand the dot as other word, so it will not stay with the last word of our sentence).
2. Add so many sentences as you want by clicking on the button 'Add a sentence'.
Your activity will look like this:
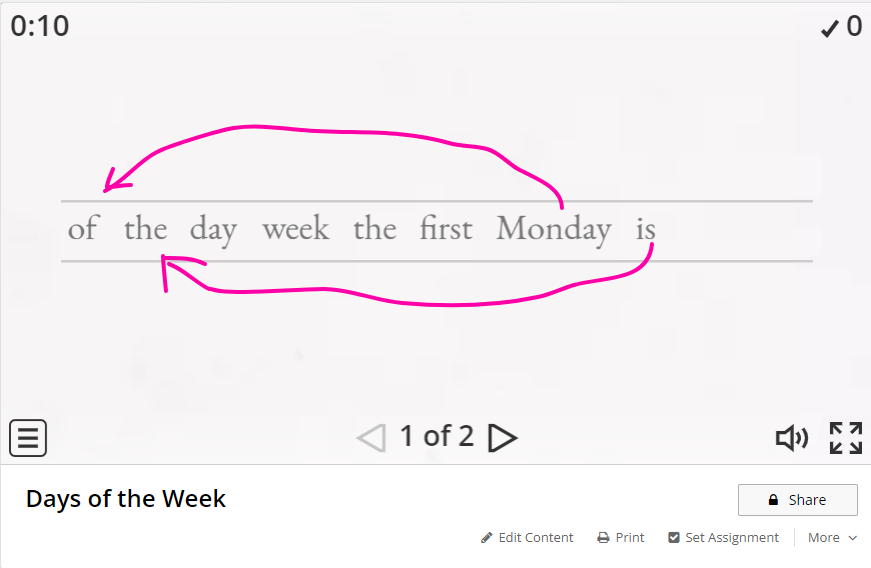
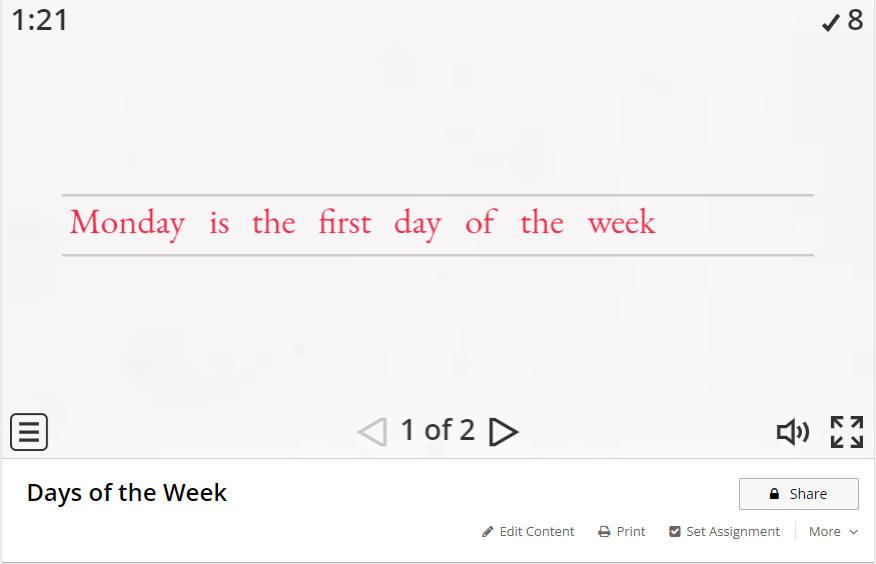
Your task is to rearrange the words in the sentence in right order by grabing them and move to the right place. Every word will color, if it is in the right place. Then it will look like this:
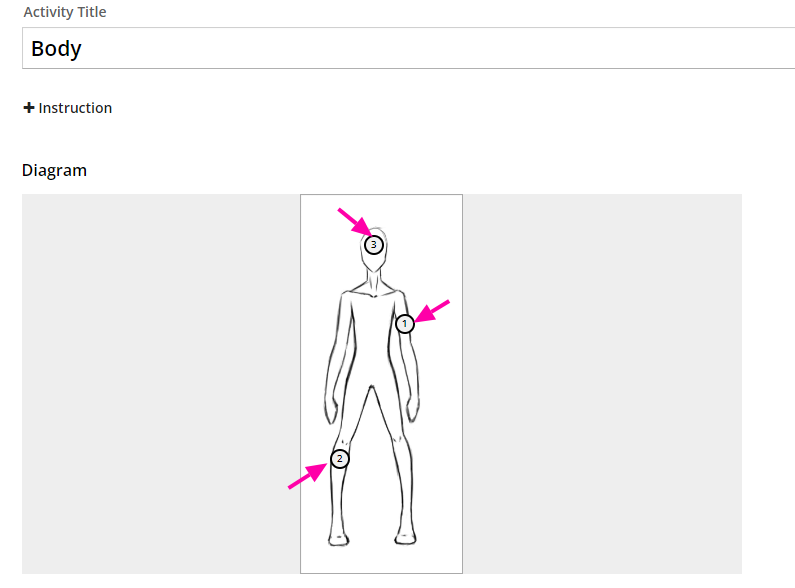
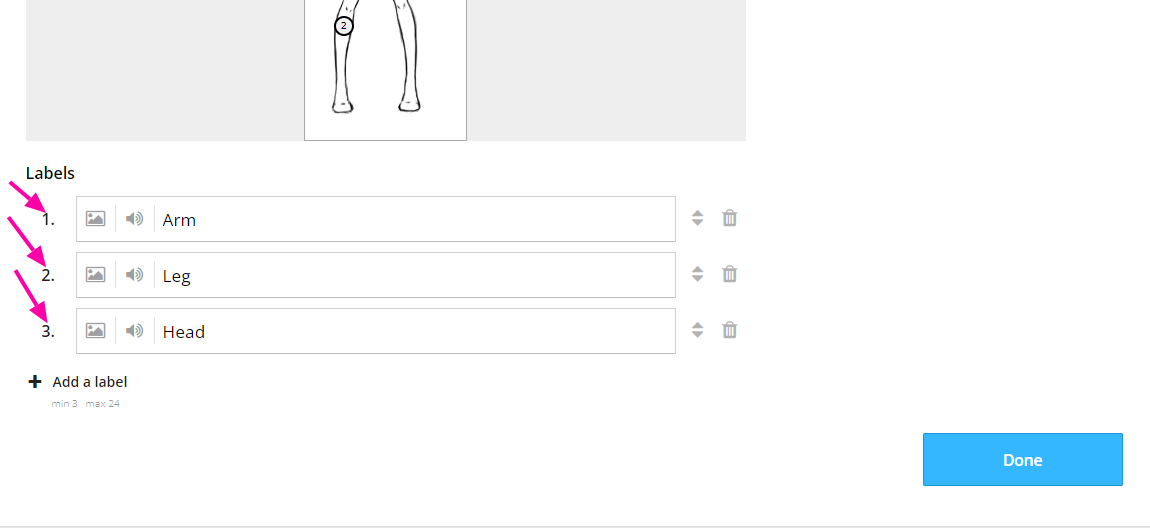
L. Labelled Diagram Activity
In the activity Labelled Diagram, you can add there any picture and mark on it the things you want your students have to labelled somhow. It is good when you learn for example parts of the body, or places on the map:
1. Find the picture you want by clicking on the button 'Add image' in the centre. You can also upload your own image by clicking on the button in the right corner 'Upload'.
2. Fill in the column the things you want to labelled on your picture.
3, In the left corner of your picture, there will be circles with numbers. These numbers are order numbers of your thing that you want to label on your picture. You have to just grab them and place them wherever you want on your picture (logically on the place you want to be labelled).
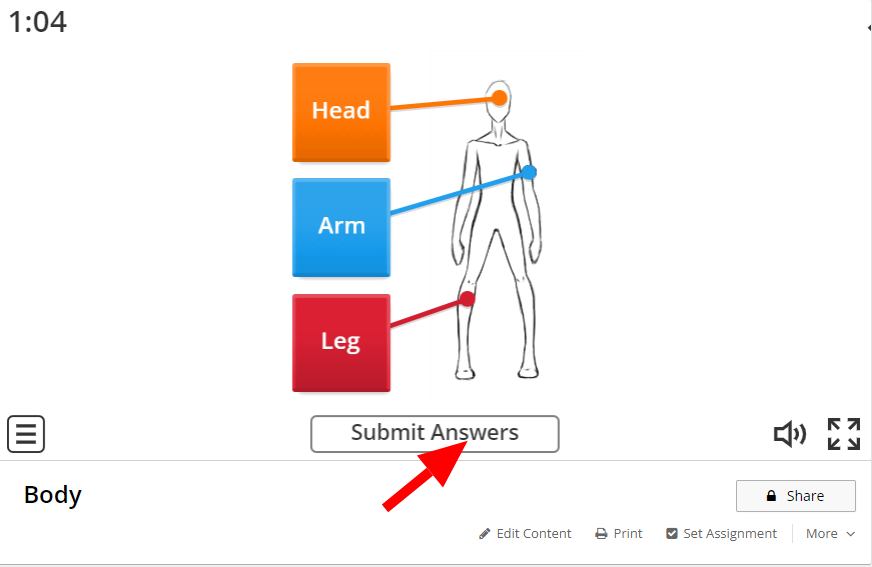
Your activity will look like this:
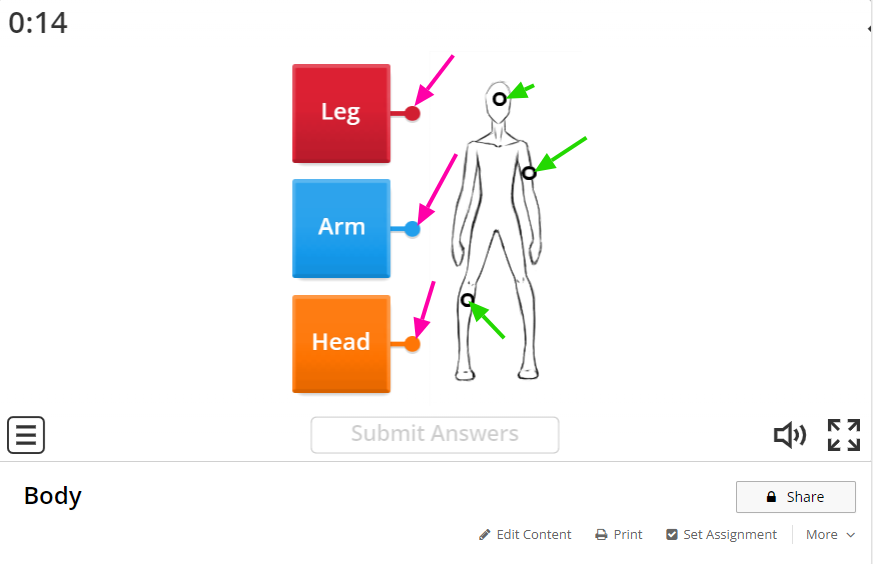
Your task is to grab the end of the item (colored circle), move it to the circle on your picture and connect it. Then it will look like this and you can click the button 'Submit Answers':
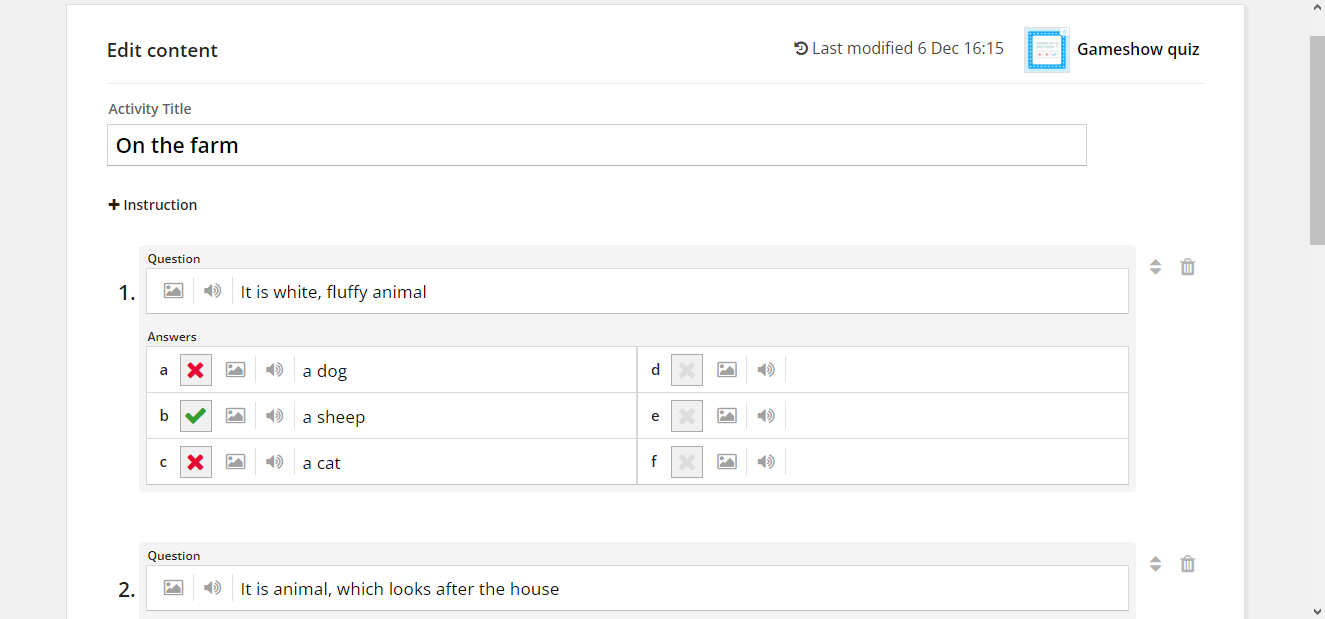
M. Gameshow Quiz Activity
The activity Gameshow Quiz is similar to activity Quiz. However, it has much more interesting display and you have there much more options in the activity/game, which we show later:
1. As in the activity Quiz, you have to fill in the question first.
2. Fill in the answers for your question.
3. Then click, which answer is correct and which is incorrect (sign X).
4. You can add more than 3 options.
Your activity will look like this:
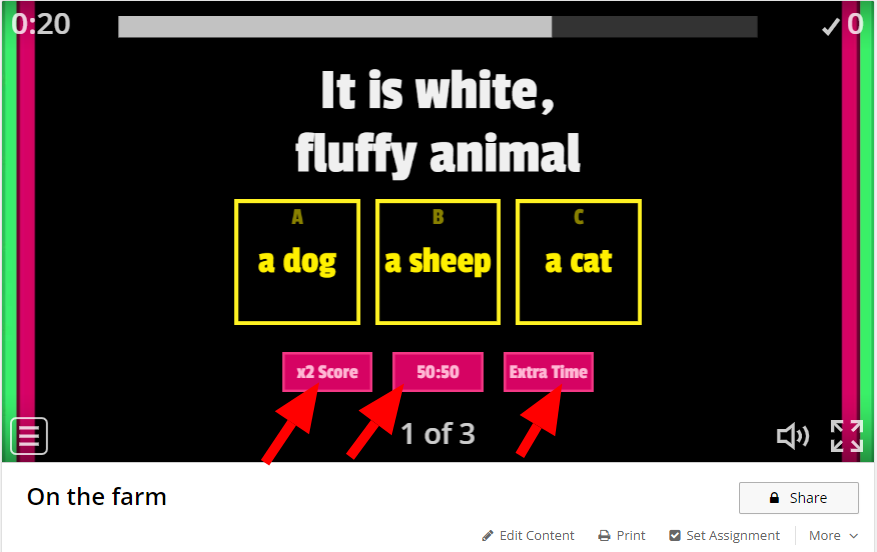
Your task is to read question or clue and choose from options below. The activity count the amount of your score after answering. There is timer and if you answer quickly, you will have much more score as if you answer slowly. So how much time you left as much you will have points. There are some three more options as you can see:
a.) x2 Score = Means, that amount of your score after answering will double. So if you answer correct and your score is 200, you will have 400 points for this answer.
b.) 50:50 = If you are not sure, which answer is correct, you can eliminate half of the options. So if we have three options there and you click this option, there will be only tow to choose from.
c.) Extra Time = If you do not have much time, because the question is very hard, you can just click this option. It will stop the time for you.
ATTENTION! You can use these options ONCE in the whole game. It is not available in every round, so be careful.
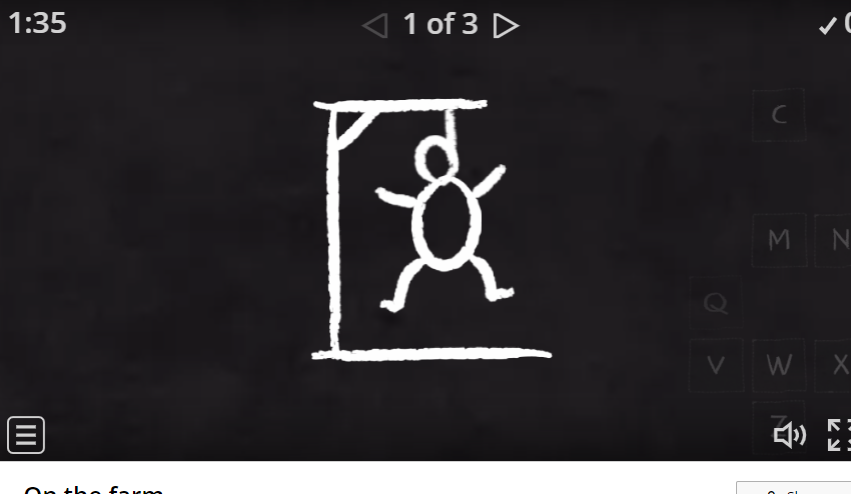
N. Hangman Activity
In the activity Hangman, your task is to guess the word. You can guess this word with or without clues:
1. Fill in the key word, you want your students to guess.
2. Fill in the clues for these key words, if you want.
Your activity will look like this:
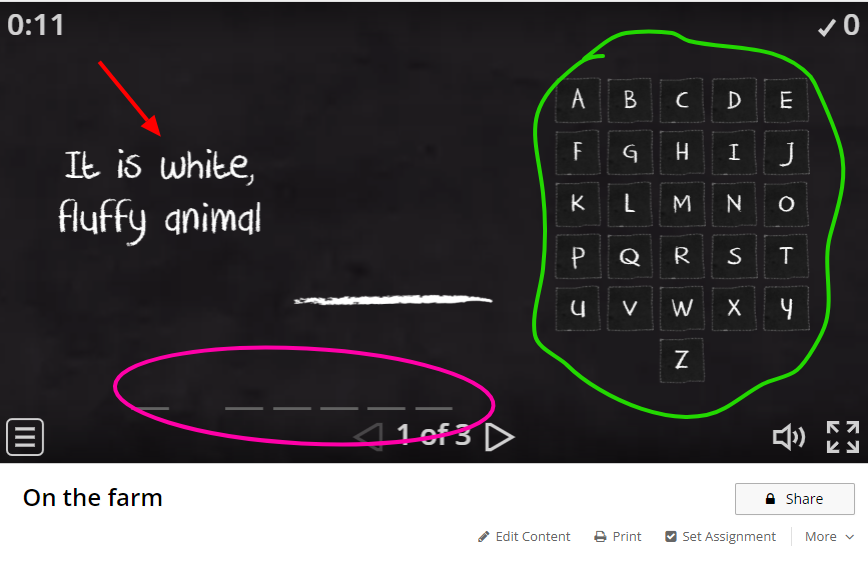
There will be the whole alphabet, the lines for your key word and also the clue, which can be there or not. Your students have to pick the letters from the alphabet that they think are in the word they guess. If they are right, the letter show on the line in the right place. If they are wrong, on the board there will appear the drawing of the hangman. But not whole, just part of it. For every worng answer, the hangman is drawn.
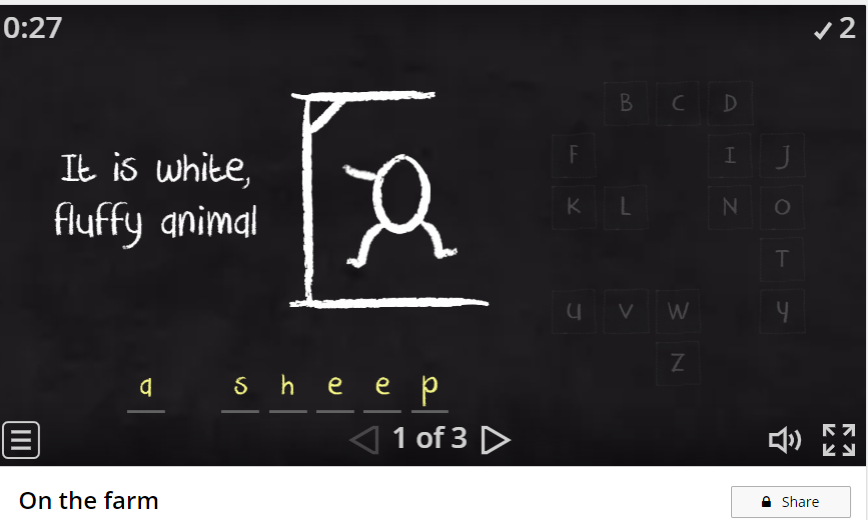
If your students can solve the key word before hangamn is drawn, they win. If not the hangam appear and then they have to start again:
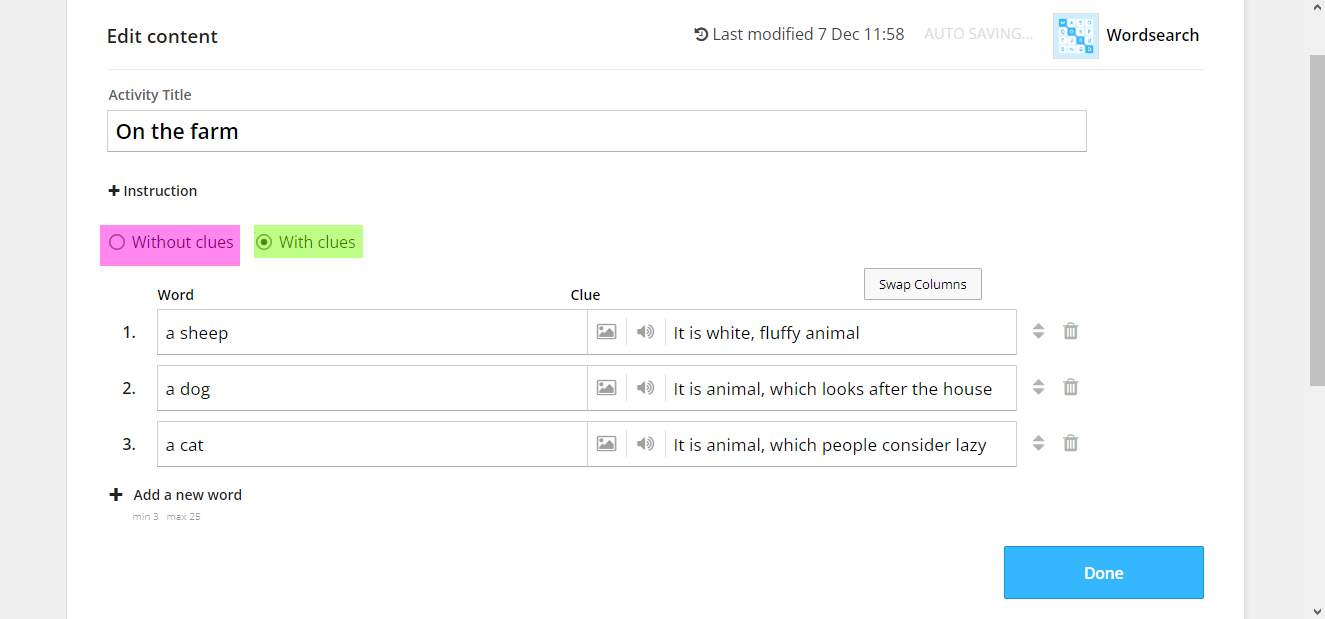
O. Wordsearch Activity
In the activity Wordsearch, you have to find the words in the wordsearch. There are 8 directions, in which you can find the word. The preparing is similar to Match Up:
1. Fill in the key words, that students have to find in the Wordsearch.
2. Fill in the clues for your key words, or pictures. Students have to know, what they are looking for. But you do not have to use the clues if you don't want to.
Your activity will look like this:
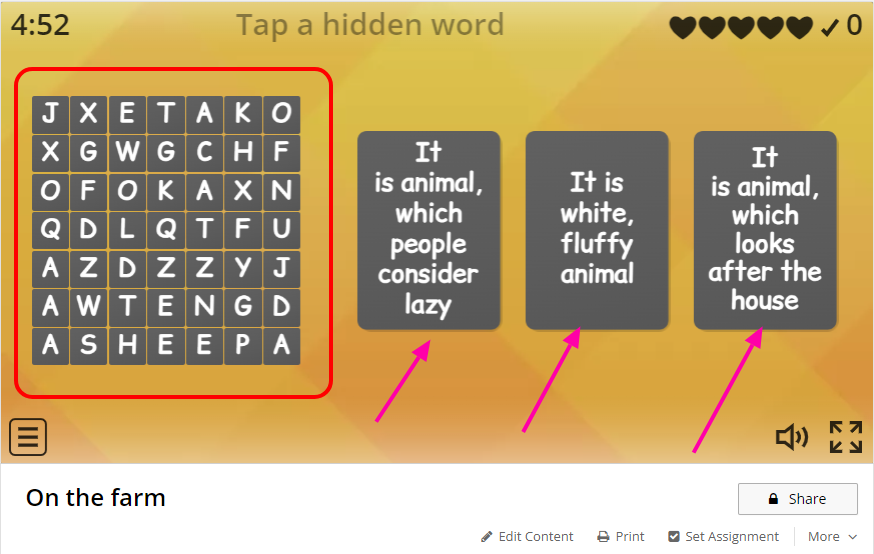
You have there on the right side clues and on the left side the wordsearch. You have to find your key word and click the first letter of your key word. Then the word will show.
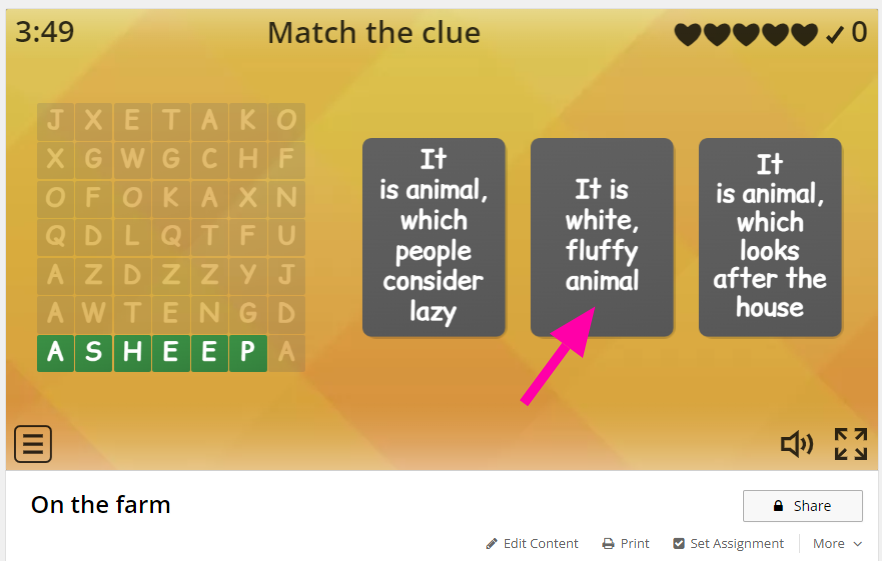
Then you have to click on the clue. The word and clue color so you do not lost there. If you are right, you can seek for another word:
P. Crossword Activity
In the activity Crossword, your task is to guess the word using the clue:
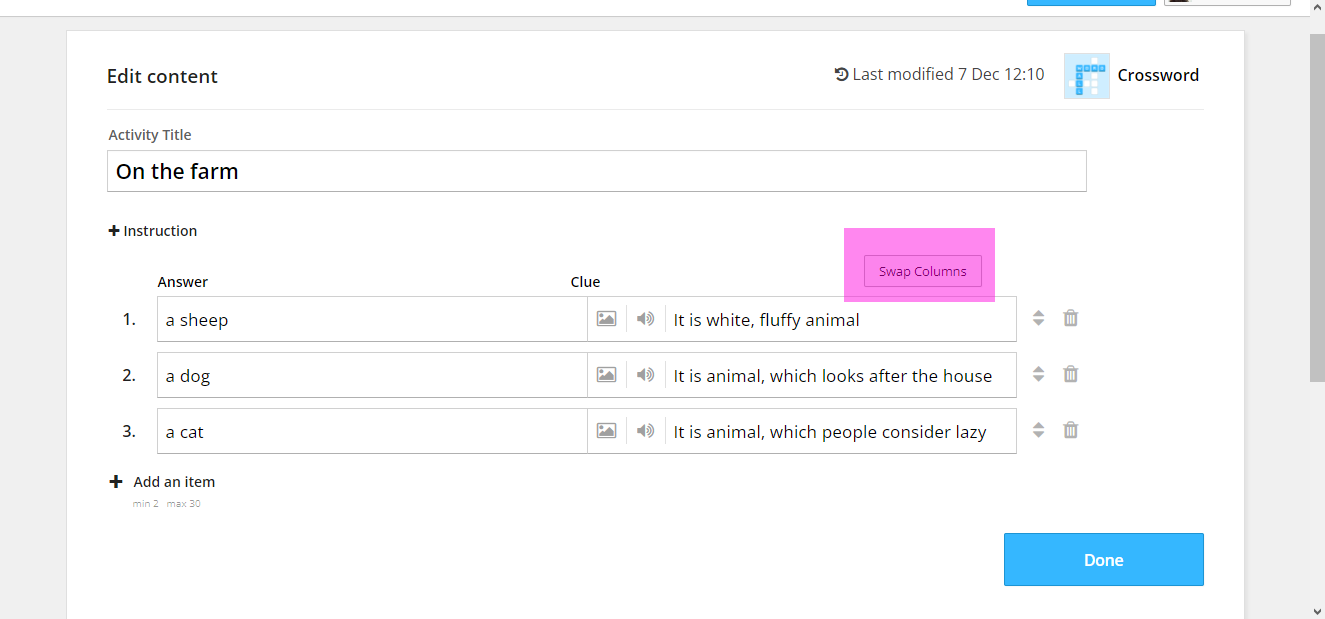
1. Fill in the key words.
2. Fill in the clues or definitons.
You can also click the button 'Swap Columns', which serve as switching key words wiht clues. It is good when you want to teach your students the key words first and then the definition for them.
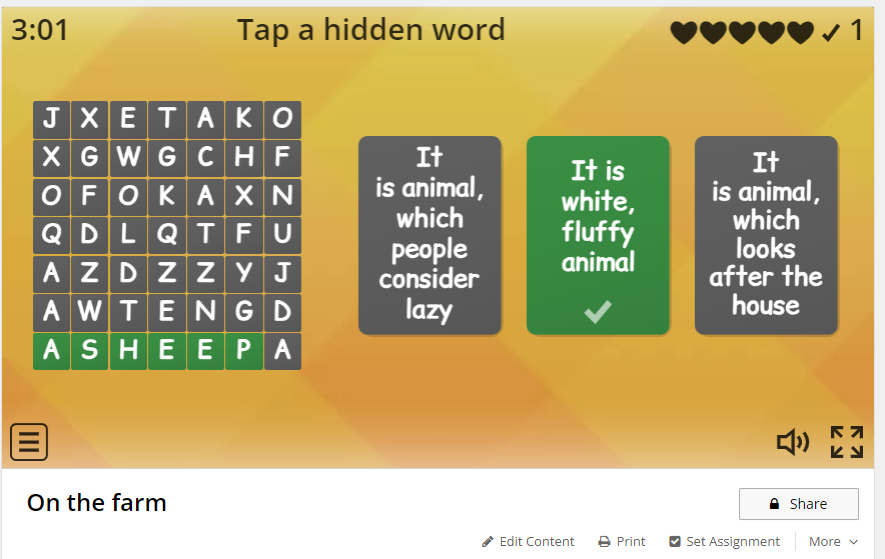
Your activity will look like this:
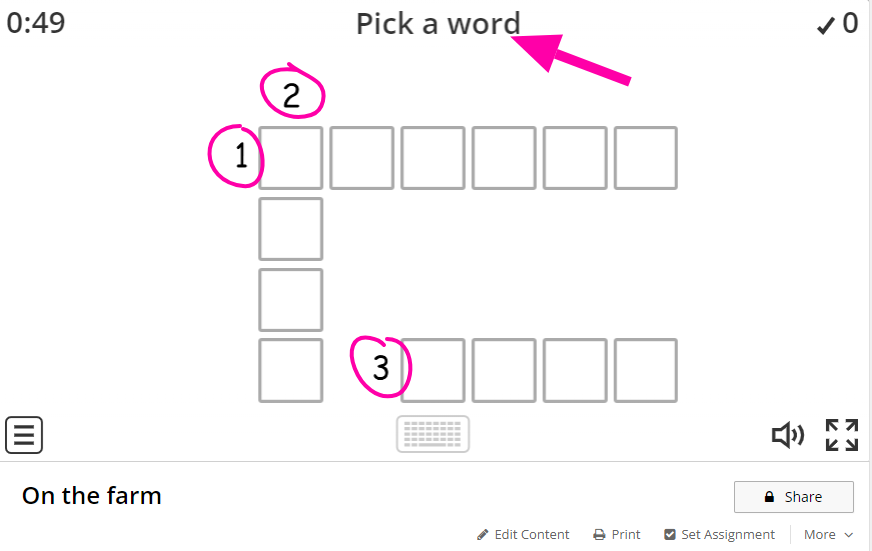
Your task is to pick the word, so pick the number, which you want to guess and click on it. The number of columns is the number of letter in your ke word.
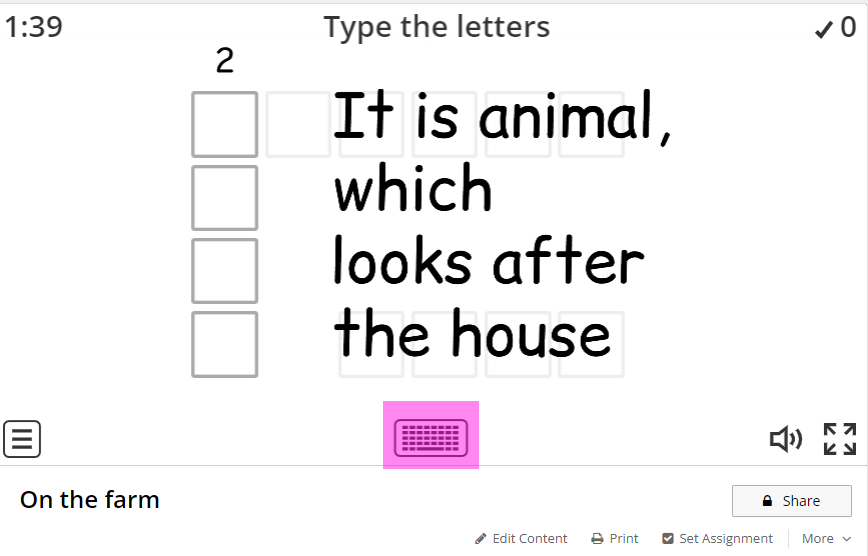
Then you can see the clue for your key word. You can use the keyboard below, for typing the key word, or your own keyboard.
If your answer is correct it colors and you can pick another word.
R. Flip Tiles Activity
The activity Flip Tiles is similar to Flash Cards. Your task is to for example name the word, what you see on the picture on the front side of the card. You can also play it like the pexeso:
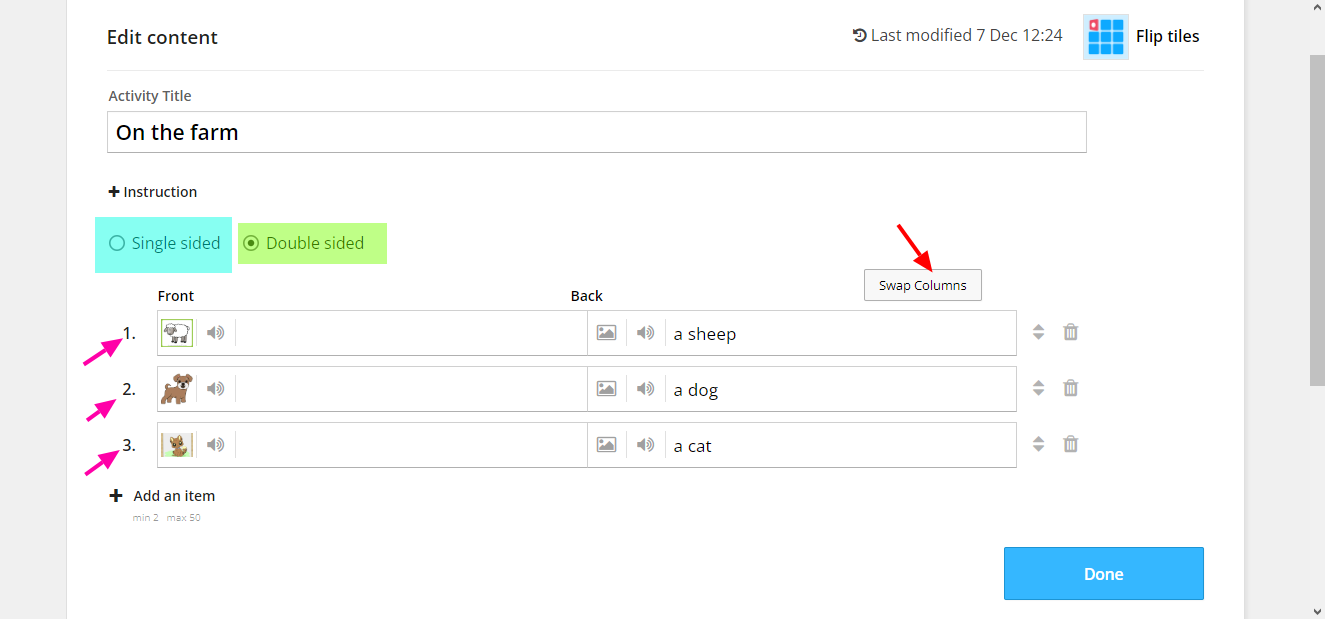
1. Fill in what will be on the front side of your cards
2. Fill in, what will be on the back side of your card.
You can have single-sided or double-sided cards. But i do not see any usefullness in having single-sided card.
RECOMMENDATION! I recommend to use picture and sounds in this activity.
Your activity will look like this:
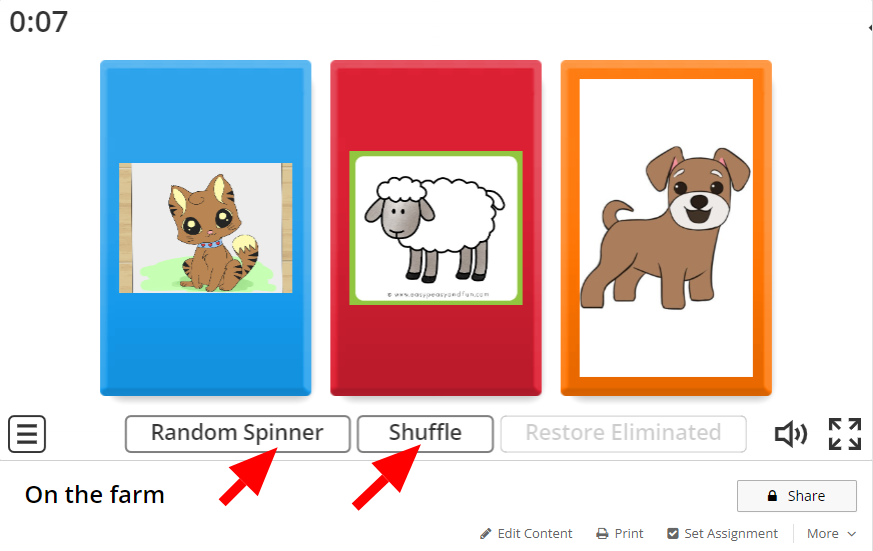
You have there three options, three cards with pictures. The task four your student is to name the item or animal on the front side of the card. You can check the answers with your students, by clicking on the card. It will flip.
There are som options:
a.) Shuffle = you can shuffle your cards
b.) Random Spinner = if you click this, it will pick one of the card randomly
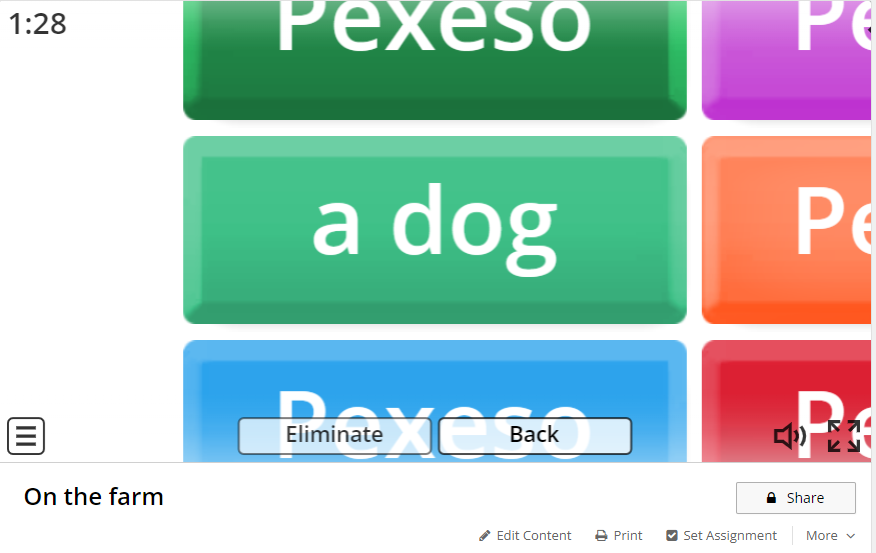
After clicking on the one card it will look like this:
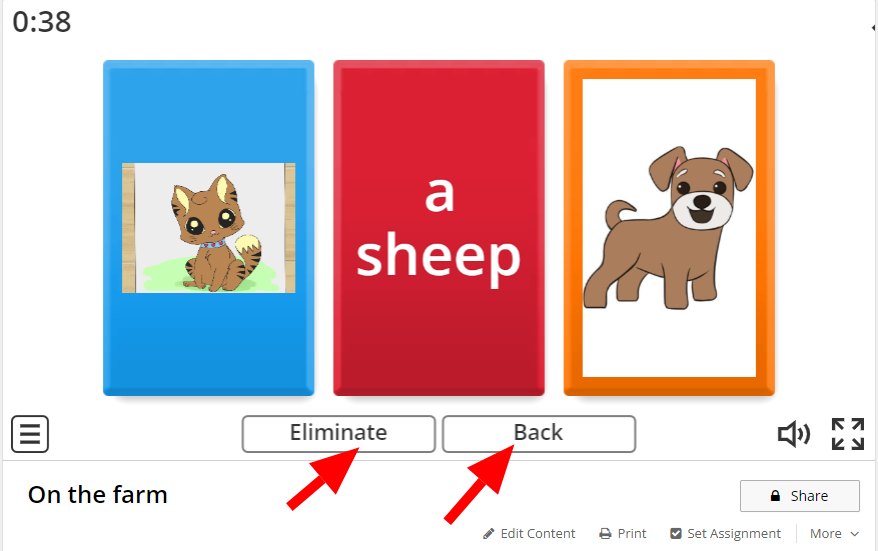
You have there another options:
a.) Eliminate = It means, that you eliminate this card
b.) Back = You can return back to all your cards
After elimination, there will remain two cards:
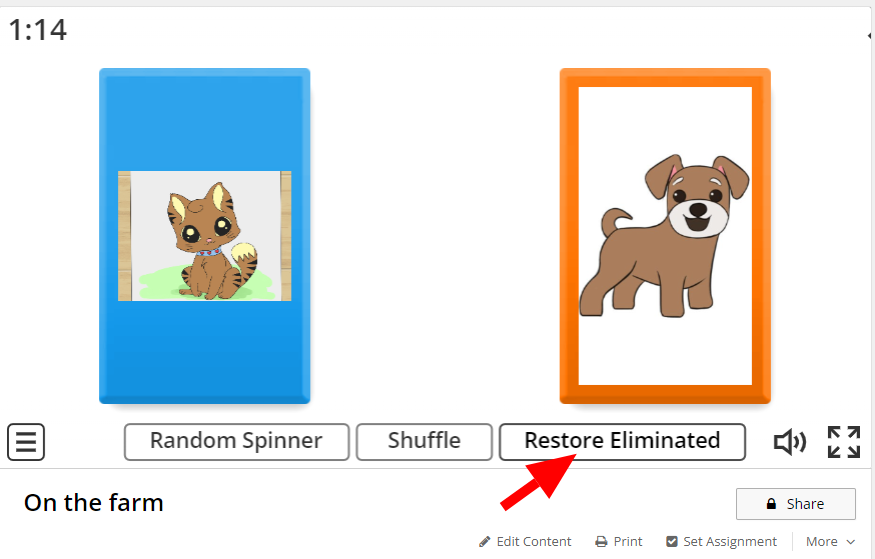
You have there one more option: Restore Eliminated = you can restore the cards, which you eliminated earlier.
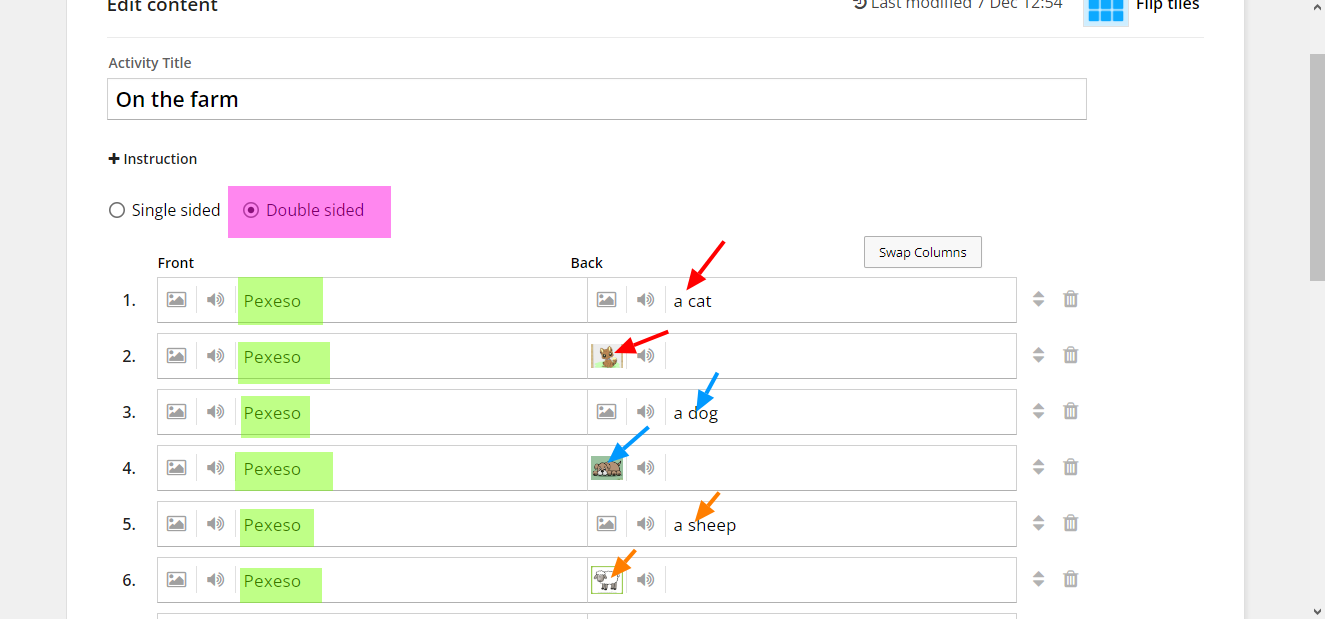
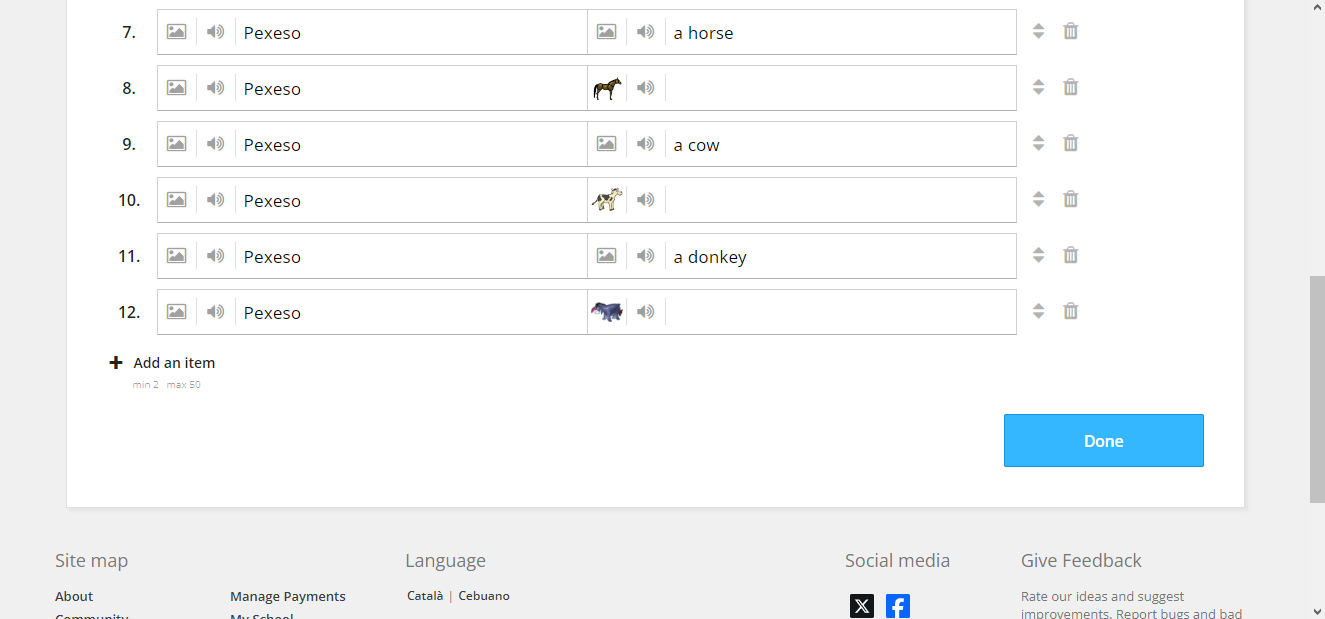
In case you want to play the Flip Tiles activity as Pexeso, you have to prepare it another way:
1. Fill in the front side of your cards with the same word, picture OR you can leave it blank.
2. Fill in the key word and then for the next item the picture for that key word.
RECOMMENDATION! I recommend to have at least 12 items for your pexeso.
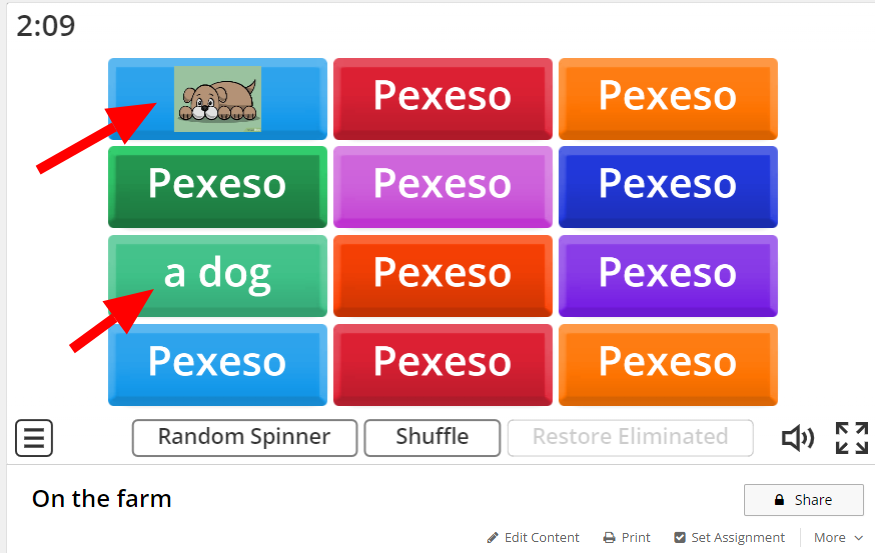
Your activity will look like this:

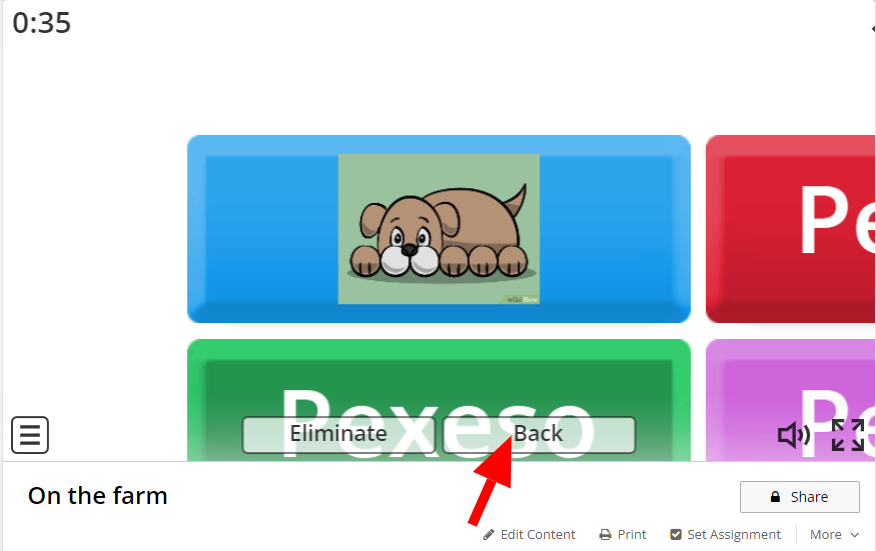
You have Pexeso, so you can play it. Choose one card or click 'Random Spinner' to choose it for you. Also you can shuffle the cards, if you want. We will show you the first match in the activity pexeso:
1. You click on the random card.
2, Then click the button 'Back'.
3. Click on the next random card and see if it is the right match for your picture (or word).
If NOT => click on the card and flip it as in the game Pexeso. Then click 'Back' and pick the next random card you want and see if it is the right one. Continue like this, unless you find your match
If YES => let it like this and continue to find matches for other cards OR eliminate both of the cards by clicking on the button 'Eliminate'
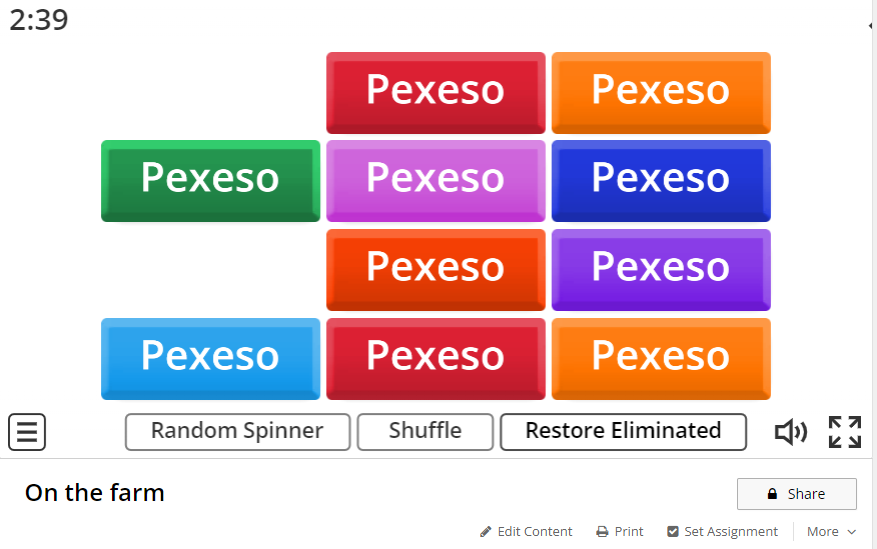
Without Elimination the cards:
After Elimination the cards:
6. Sample Activities
There you can find some sample activities I made for students. Below them, there are link on the Wordwall - there you can find them too.
Enjoy! ❤️
1. Get to know each other Activity:
2. Body parts Activity:
3. On the farm Pexeso activity:
4. Past simple and Past continuous Activity:
7. Do's/Don'ts
In this chapter we provide some Do's and Don'ts for the platform Wordwall:
A. Be creative:
The Wordwall net enable us to do many creative activities. However, many teachers do not benefit the maximum for it. In other words, Be creative! Make the activities as much creative as you can! Use themes, fonds, change the pre-setted options to fot your classroom.
B. Switching templates:
Be aware with switching templates. Some of them might fit to another, but few don't. If you do not pay attention to, what do you create, you might easily fall into chaos. By every switching you must click 'Edit content' to make sure your key words will fit your answers and it will be engagging for your students.
C. Options:
What consider options, there are many. By every activity, you should check your options and try every of them. What it does, what it makes worst. Just try it and see what will fit best for your classroom.
D. Do not forget to share:
I know, it might be terrifying to share your own project. You may ask yourself, if someone will like it or use it as much as you do. Do not be afraid. We all try our best to please our students and teach them well. If you share your content, someone could be inspired by it, and even if they do not use your original activity, they can do something else on your base.
And do not forget: As much you help, as much you gain!
Hope you love The Wordwall as much as we do!